

When you discover photos on your SD card are corrupt or the memory card itself is corrupt you should:
- Do as little as possible (read: nothing) with the card.
- Do NOT run chkdsk on the card itself!
- Do not format the card even if it asks you to!
Instead:
- Create a disk image of the card immediately!
There are free and paid ways to try to recover or repair your photos. So I’ll be showing an example of how you can do a JPEG repair using free tools such as the HxD hex editor, JpegSnoop and Paint.NET.
RAW disk image
To create a disk image use the free version of ReclaiMe or Win32 Disk Imager. Most serious data or file recovery software allows you to create such a ‘RAW’ disk image. In turn, a RAW disk image created with one software can be processed by other file recovery software as well. Avoid Stellar file or photo recovery software as they require a proprietary disk image format.
| 05/27/2020 edit: JpegDigger now includes a built-in disk imager |
|
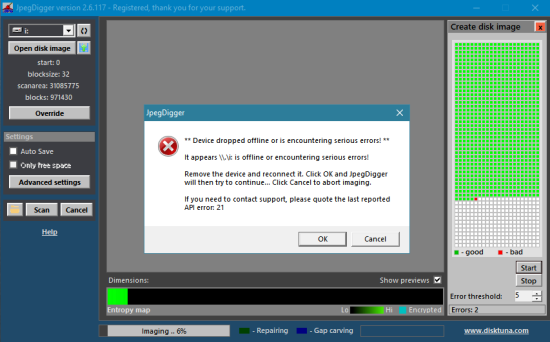
JpegDigger (trial too) can be used to create disk images of memory cards and USB flash drives. More on JpegDigger photo recovery (click) Creating a disk image of an SD Card (or any memory card) or USB flash drive:
Deciding on a block size. A large block size is faster. If the card or flash drive is stable, this is a good option. If there are bad sectors on a card, a single bad sector will cause an entire block to be skipped. JpegDigger fill these with zeros as zeros are least damaging to JPEG data. Many disk imagers either fill such skipped blocks with a byte pattern or strings (like ‘BAD SKIP’), but these are far more disrupting to JPEG data. So, with a block size of 64, 64 sectors are skipped if one bad sector is encountered, losing potentially 32 KB worth of data. This may sound like a bad deal, but consider that bad sectors will slow down imaging considerably and that bad sectors tend to ‘group’. A block size of 64 potentially skips a bunch of those grouped bad sectors. Also USB isn’t particularly good at dealing with bad sectors, and may simply disconnect or drop the device if it takes too long to respond. So, avoiding bad sectors is good. If USB drops the device, JpegDigger will try to detect this, pause imaging and allow you to remove and re-insert it. If it does not detect it consecutive reads will result in errors and once the value you set for read threshold is reached it will pause and allow you to remove and re-insert.
|
The image format (of the photos) does not matter at this point, whether you are shooting in JPEG, CR2, NEF or any other format. Your first priority should be getting a sector by sector disk image of the entire card.
If you already ran chkdsk and the files on the card were converted to filennnn.chk files
I still strongly advice to create a disk image file of the card! Then copy all files with the filennnn.chk format to a hard disk. Use one of the tools mentioned here to convert the CHK files: https://www.raymond.cc/blog/how-to-recover-chk-files-created-by-chkdsk-and-scandisk/.
Photos on SD card are corrupt, what’s causing it:
There are two important factors to consider, the file system on the memory card and the actual content of your files. Both need to be right in order to be able to view your photos (or any other file). In general the file system on a memory card is either FAT32 or exFAT.
- File system needs to point correctly to all clusters allocated to any specific file
- The contents of the file need to be intact and un-corrupted
If a file system is severely corrupted you may unable to actually see any of your files: Usually the type of file system is ‘RAW’. If you can actually see the files in file explorer, it is difficult to determine if whether the file system is corrupt (1), or the files themselves (2). Once you have created a disk image of the memory card it is safe to investigate. As a rule of thumb, if close to all photos on a card are corrupt it may very well be the file system that is damaged. It is however also possible the files are listed but their contents appear corrupted.

Corrupt JPEG Header will get you this ..
File system corrupt
Option 1: File recovery / Photo recovery software
In this example I will try to recover the JPEGs from a corrupt flash drive that was sent to me by a customer. It is actually the case that prompted me to write the first quick and dirty version of JpegDigger. Of course the case was brought to me as a corrupted JPEG file issue. After further diagnosis it turned out that not the individual files were corrupt, but the underlying file system.
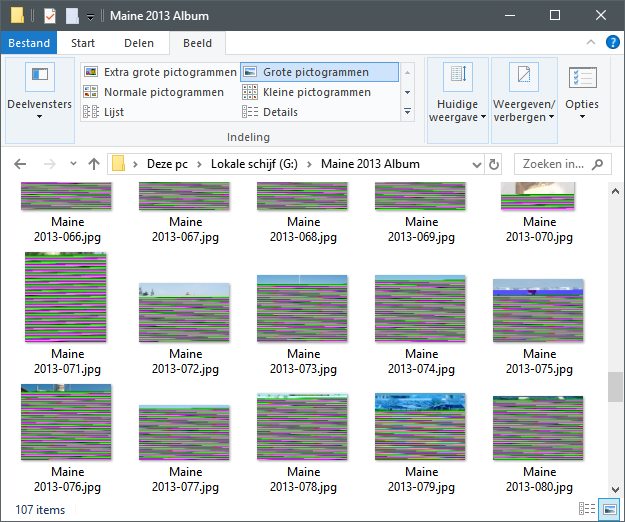
Corrupt file system memory card: Virtually ALL photos are affected and corrupt!
If the corruption is limited to the file system you should be able to recover the files in general. File recovery software that relies on file system structures (majority of mainstream file recovery software) it will run into the same problems as the file system driver (ergo: corrupt files). You will be needing a so called ‘carver’.
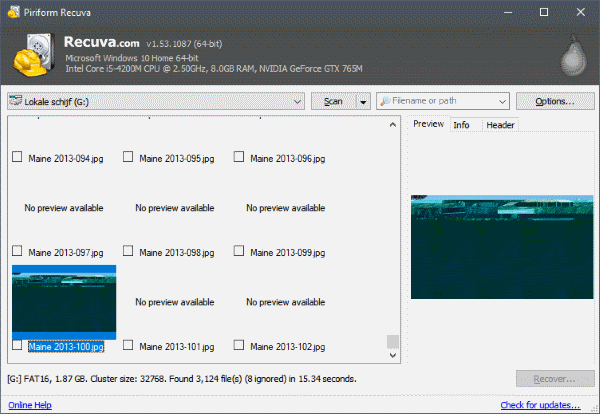
Recuva, a free undelete tool can not recover the corrupt JPEGs
A carver ignores file system structures and scans the disk for file structures (rather than file system structures). A major factor between success and failure is if the files are stored in contiguous blocks. If they are any decent JPEG carving software will do unless JPEGs are stored in non contiguous blocks. JpegDigger is inexpensive and fast and was able to restore the JPEGs:
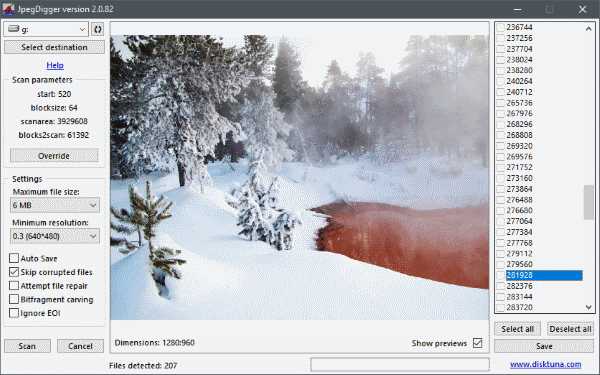
JpegDigger did recover the JPEGs from the corrupt file system
Difference in number of files found in above screenshots is explained by the fact that JpegDigger only detects JPEG where a file system based file recovery tool typically detects all file types that it can find references for in the file system. Drawback of a carver is that original file names are not restored.
If you need support for more file types and advanced image reconstruction try something like JPEG Recovery LAB (JPEG, CR2, NEF are supported as well as AVI, MP4, MOV and MPEG-2 video formats). It can recover intact photos and videos where other software fails!
Option 2: Safe way to run chkdsk if photos on SD card are corrupt
Although I urged you not to run chkdsk before, there is a possibility to use chkdsk safely on a memory card! I will explain how, but before that:
As chkdsk will change the contents of your disk image, I suggest you work on a copy of this disk image file! After all, the disk image is your safety net.
- Use ReclaiMe to create a disk image file of the memory card
- Use VHD format rather than RAW
- Mount the VHD file in Windows (right click > mount)
- Run chkdsk on the drive letter assigned to the VHD file.
Photo itself is corrupt
Files commonly start with a header, after which the actual file data follows. The header helps software interpreting the data within the file. If the header is intact, the software (image editors and viewers) can use it to decode the actual image data. Most likely you can not open the digital photo at all if the header is corrupt. If the image data itself is corrupt the image will open but look distorted.
For the rest of this article I will address JPEG only. If you shot your photos in a different format (like RAW) you may be able to use JPEG-Repair Toolkit to extract JPEGs from those. Below repairs done with a hex editor can be done automatically by JPEG-Repair Toolkit.
Corrupt JPEG Header
Step 1:
Open the file in a hex editor (like the excellent freeware HxD). Verify there is actually data in the file. If the file only consists of zeros or a byte pattern (like FF FF FF FF etc.) then the file is beyond repair.
Step 2:
Using HxD: Use Search > Find, search for FF DA using HEX data type. If not found the file is beyond repair.
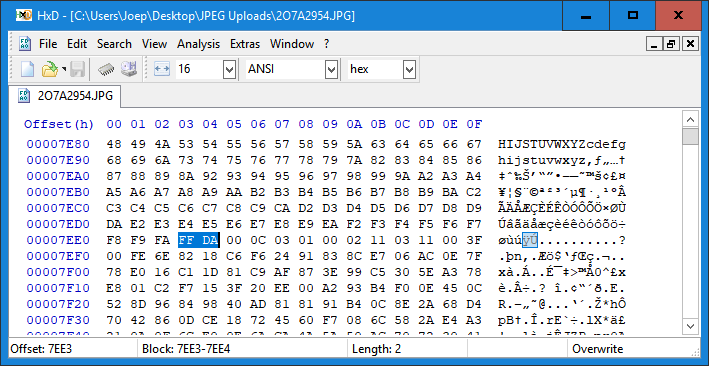
Find the last instance if FF DA using HxD
It is possible multiple instances of FF DA are found, you need the LAST one. There may be a few if the JPEG included a thumbnail and preview.
Note: If you find many FF DA byte combinations then you’re probably not looking at JPEG data but random binary data. The file then is probably beyond repair.
Write down the address (Using View > Offset base you can switch to decimal numbers if you like). Now search for FF D9. Or, go to end of the file which is where you’d normally find FF D9.
Once found, select the entire block including from the last FF DA upto and including FF D9 > right click > copy.
Open a new file > Paste Insert > Save as ‘image.jpg’. You have now copied the image data to a new file.
Open a known good file that was shot with the same camera, using same resolution and orientation (portrait/landscape).
Use Search > Find, search for FF DA using HEX data type.

Search, set data type to Hex-values
It is possible multiple instances of FF DA are found, you need the LAST one.
Select the block preceding the FF DA bytes all the way to the start of the file (FF D8)
Switch to your image.jpg file TAB containing the image data, make sure you’re at offset 0 (zero) > Paste Insert > Save the file
If damage was limited to the header you should now be able to open your file. Open and Save it using something like Paint.NET (free) to update the file thumbnail (if any).
Alternatives for repairing JPEGs:
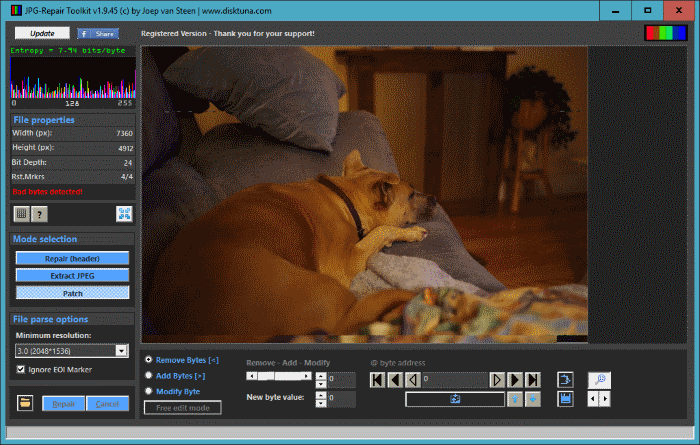
Use photo repair software like Hetman File Repair or Stellar JPEG Repair. Or even better, DiskTuna’s JPGRepair.
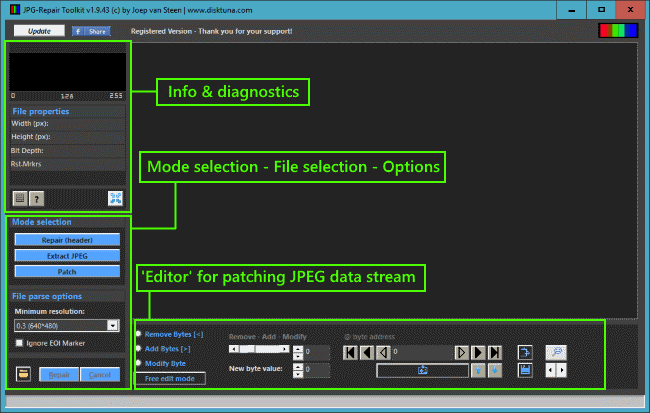
JPG-Repair Toolkit will patch the header from an intact JPEG on a corrupted JPEG photo and more ..
Apart from trying to fix the header this software also attempts to find embedded JPEGs. Often, this is all they can do if a header is too corrupt. A free alternative for extracting those JPEGs is JpegDigger.
Corrupt Image Bitstream
Here’s where it gets really complicated!
One of the things I initially used is JpegSnoop to find out where the JPEG decoder choked while decoding the image. JpegSnoop will give you the exact byte address. It is the easy way of finding invalid JPEG Markers.
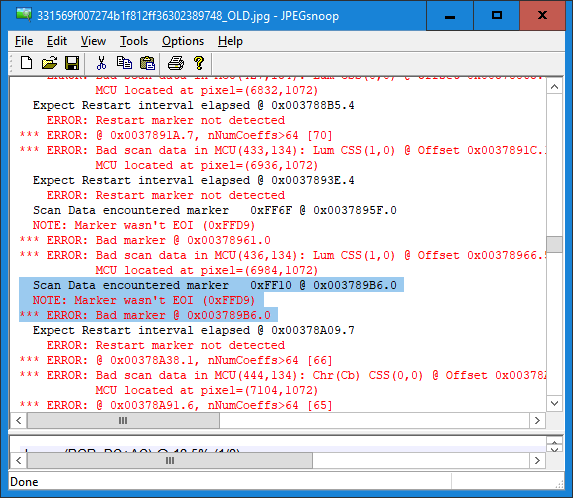
JpegSnoop can help you find invalid JPEG markers
Once a JPEG decoder starts decoding the image bitstream it does so until it hits FF D9. FF has special meaning to decoders. It means a marker follows. In between FF DA and FF D9 there is only a limited number of JPEG markers ‘allowed’:
FF 00 (zero, zero) and FF Dn where n is a value from 0 to 7. Stripping anything that does not follow this rule or replacing FF XX where XX are arbitrary values by FF 00 should get you an image that decodes all the way.
Then you may be able to repair remaining damage or corruption using something like the freeware Repair-Jpeg. It allows you to realign the image and remove color bands etc..
If your image contained so called Restart Markers repair may be simply a matter of editing it with a tool like Paint.NET. Restart Markers prevent corruption propagating further into the image.
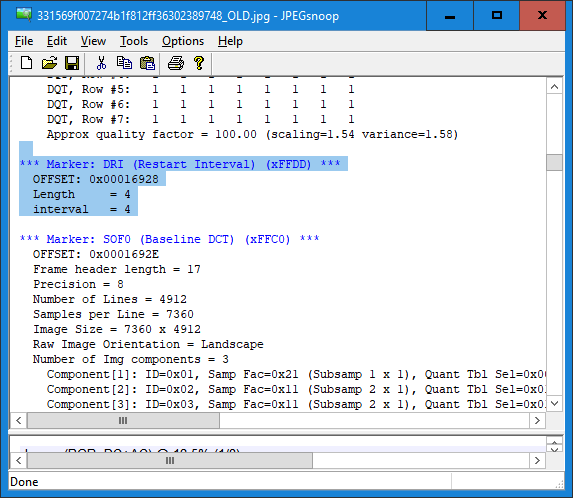
This JPEG contains Restart Markers
Example:
This JPEG contains Restart Markers. All I did was strip invalid JPEG markers from the image bit stream. The free software used to repair this JPEG Photo is:
- JpegSnoop
- HxD hex editor
- Paint.NET
This image can be found here (Kudos to Gracie for letting me use the photo!):

Corrupt JPEG
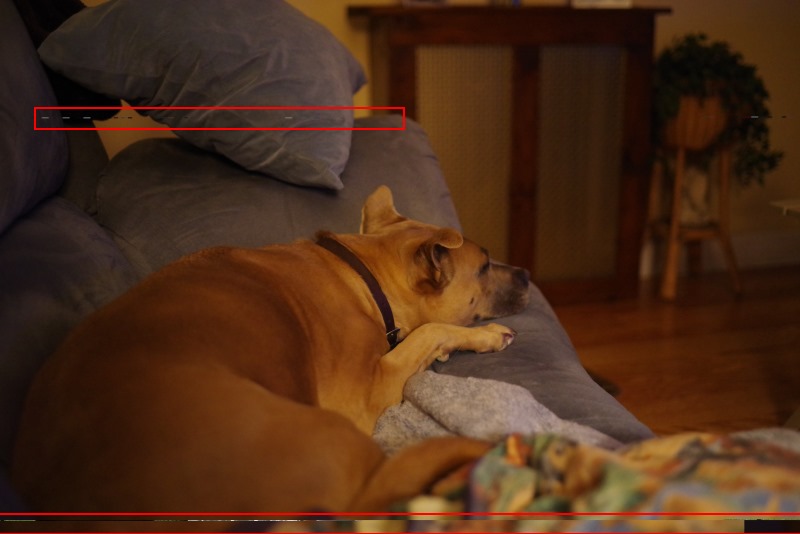
Same image after removing invalid JPEG markers

Same image after cutting lower part and clone stamping using Paint.NET
Rather than removing all invalid JPEG markers using JpegSnoop and the HxD hex editor, JPG-Repair Toolkit can do this automatically. It ‘knows’ restart markers so it will leave those alone.
Conclusion
It is often possible to repair corrupt digital photos yourself if photos on SD card are corrupt. It is often even possible with free tools as demonstrated in this post. First step is to figure out if it is the individual photo that is corrupt or the underlying file system. If the latter then you need to recover the photos rather than repair them.
Repair of individual photos can be done manually using a hex editor or you can use photo repair software.
Hi Joep,
Can you please send me your e-mail so I can send you some ok and not ok photos, to tell if are repairable?
Thank you in advance,
Stelios
joep@disktuna.com
Thanks for sharing the great article I also bookmark this page. And I wish you write more about this type of blog in the future…
I was shooting video with a Canon 5D mk3 and using a Lexar CF 128GB Professional 1066x . The battery was low and I must have been turning it off to fast because now the camera says …’’ Card1 cannot be accessed Reinsert/change the card or format card with camera. ‘’ and attaching my usb card reader to my Mac it shows as nothing at all. Like not recognizing it at all. My other card work fine in camera and recognized by card reader. How can I successfully get my videos off the corrupted CF card? Trying not to freak out. Thank you!
Hello,
So you have a Mac, no PC available at all?
It is likely the file system on the card is corrupt. So for now I’d assume the files are recoverable. Since my software is Windows only, this runs on Mac too: https://www.cgsecurity.org/wiki/PhotoRec. It’s free.
For the rest I am not really familiar with Mac, you could have a look here, https://www.macworld.co.uk/feature/mac-software/best-data-recovery-apps-3681531/.
Hi,
I formatted my CF card which is 15GB and then I overwrote 1/5 of the card. The next day, my laptop where I had my backup, got stolen. My question is – can I recover the files that have not been overwritten? I tried using Bad Copy Pro, but it didn’t work. Please help!
Data that was overwritten can not be recovered. However, all photos stored further than that 1/5 may still be recoverable with something like JPEG Recovery LAB: https://www.disktuna.com/jpeg-recovery-lab-digital-photo-recovery/
Hi. I moved my pictures from my mobile to new micro sd 128gb (sandisc ultra 100mbs class 10) and some pictures doesn’t open. Do you thing I have to repair this pictures. If yes how? If I send you a picture and repair it I will buy this prorgam to repair and the other average 100 pictures damaged.
Do you thing that you can repair this pictures?
You have 2 options:
1. Try the software JPG-Repair. The idea is you try it yourself. If it works it can help you repair your photos. If I can repair the files using this software then so can you.
https://www.disktuna.com/jpgrepair-fix-and-repair-corrupt-jpeg-headers-and-invalid-markers/
2. Submit the files to my JPEG Repair Service. I can do a lot more than any automated software can do. But since it’s manual repair it is more expensive.
https://www.disktuna.com/jpeg-repair-service-ordering-pricing/