

For my JPEG Repair Service I am often asked to repair JPEGs that only partially display. The bottom half of JPEG is missing or greyed out. It is also possible the missing part of the image is a solid colored block.
First step is to determine the cause. Depending on the cause we can fix the photo or not. Some of the diagnostics in this post require the JPG-Repair Toolkit, the free version will do. Once we have determined if the half grey JPEG photo can be repaired, I will show you how, using JPG-Repair Toolkit.
Step 1. Diagnosing the half grey photo (JPEG)
1. Compare the sizes of the affected JPEG(s) with files that were taken with the same settings. If several intact photos show a size that is about for example 3 MB, your corrupt should have about that same size. If the size of the corrupt image is however substantially smaller, then it is probably beyond repair: A portion of the image data is simply missing. If the damaged file approximately is the same size as the intact photos then continue to the next step.
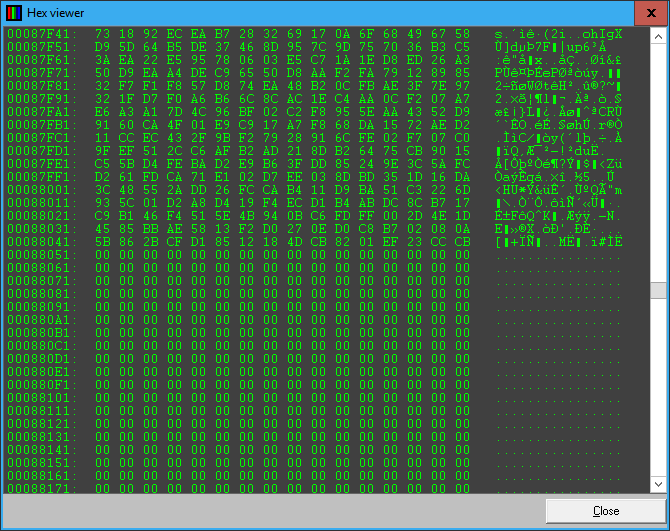
2. Examine what’s inside the file. I used to recommend this using the HxD hex editor, which may sound intimidating, but it is not. Simply open the file in HxD and browse through it. The first part of the file may contain some recognizable text, this is the header of the JPEG file. Actual image data appears totally random. If at some point this random data turns into zeros or a repeating pattern (often FF FF .. or 55 55 ..) then you have found the cause for the JPEG corruption: JPEG data was written over or never saved in the first place: this file can not be repaired. If data continues to be random, and the last bytes of the file are FF D9 then we can probably repair the image.
Alternatively use JPG-Repair Toolkit. Select Patch mode > click the folder button and select the file > click repair. If the grey portion of the file is shown then the JPEG corruption can probably be repaired. If the grey portion does not show and entropy is NOT be between 7.6 – 7.9 bits per byte, the file is beyond repair. In the info section JPG-Repair will display ‘Probably not JPEG’. So, for a healthy JPEG, entropy is somewhere between 7.6 and 7.9 bits/byte.
Bottom half of JPEG is missing, so is the data…
In summary, in order for the ‘bottom-half-of-jpeg-is-missing’ to be repairable, it’s size needs to be comparable to similar intact photos. Also, it needs to contain seemingly random data for the most part with an entropy of somewhere between 7.6 and 7.9 bits/byte.
Step 2. Repairing a half grey JPEG
Key component of the JPEG file specification is the use of so called ‘JPEG markers’. Using these markers, a JPEG image is divided into sections. Examples of markers are FF D8 (start of image marker) and FF D9 (end of image marker).
Random data corruption in the actual image bit stream of a JPEG can result in occurrence of reserved byte combinations (like the end of image JPEG marker). Software like photo viewers and editors are likely to abort decoding image data when such an invalid JPEG marker is encountered. This results in the image being cut off and turning grey for the remainder.
It is rarely that it is just this one byte that got corrupted, but for some reason this type of corruption often seems to ‘clutter’. So, we’ll see blocks of corrupted data. If we limit ourselves to repairing the invalid JPEG markers, the image will render entirely but it will still show color errors and image shift. Due to the way data is encoded and compressed in JPEG, one corrupt byte will influence all data following it.
Solution is to repair invalid jpeg markers and remove corrupted data from the image data. This can not be done using a normal photo editor, we need to ‘patch’ or edit the compresses and decoded data directly. JPG-Repair Toolkit includes a tool that allows you to add, remove and alter bytes in a JPEG file and offers visual feedback.
JPG-Repair automatically deals with invalid markers. It is however the user of the software that needs to edit the RAW, uncompressed image data and view the results of his manipulations.
Repairing a half grey JPEG using JPG-Repair Toolkit:
- Run JPG-Repair and select ‘Patch‘ in mode selection.
- Click the open folder button and select the JPEG in question.
- Click Repair. JPG-Repair will now automatically correct invalid JPEG markers and try to render the photo.
- It is up to you, the user, to remove remaining corruption and correct image shift. In short this means you will first be removing bytes (the corrupt data). Often this will allow you to correct color errors, it will however cause the image to ‘shift’. To correct this shift, bytes need to be added. Later versions of JPG-Repair allow to this simultaneously.
Using JPG-Repair Toolkit to repair half grey photos is explained in this how-to video:
Interpreting the JPG-Repair entropy and byte histogram section
Note: Starting with version 1.7.84 JPG-Repair offers 2 tools to determine if a JPEG may be fixable or not:
- Entropy of data inside the file
- Byte distribution histogram
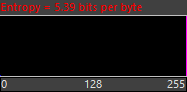
Example of file with lower half of file filled with a FF FF byte pattern. Entropy is too low (red). Histogram is flat apart for value 255 (FF in hex). The file can not be repaired.

Last part of this file is filled with zeros. Entropy is too low and histogram is flat with the exception of one bar which is maxed out for the zero value. This file can not be repaired.
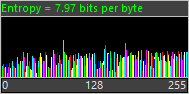
This file shows a healthy histogram (more or less uniform distribution of bytes, high value for zeros is normal for JPEG) and good entropy. This file is a good candidate for repair.
Please note that entropy being low and unhealthy byte distribution is the primary cause for the files being beyond repair. It is not a limitation of the software. IOW, the file is dead, Jim.
Any idea what causes the JPG to cut off the bottom and have a reduced size? I had a time about 15 years ago when all the JPG on my hard drive do this and they all were cut down from 1 MB to 28KB. This corrupted all the JPG and I had to restore from backups. Now, I am noticing it happening again (Obviously a different computer) and the file goes from 1.5 MB down to about 185 KB. It is ALWAYS the bottom that is cut off and it seems limited to specific folders. Is this a virus? Is this a hard drive problem? Trying to figure out how this happens, understanding it is not recoverable since the data is gone.
File size as you see it in Explorer is a ‘property’ that’s kept in file system. So file size decreasing is due to file system displaying incorrect size. Is this a HDD or SSD and what file system?
It may actually be recoverable if you stop using the drive as the file system being incorrect does not mean actual data disappeared.