About this post
This is quick write up about observations during recovery of an ‘unstable’ USB flash drive (pendrive, USB stick). This also in response to messages I pick up in various forums, where people struggle seeing how DeepSpar’s USB Stabilizer can help them improve disk imaging – while they do see how it’s a useful device for providing write blocking and prevention Windows from freezing due to unstable USB flash drives (and memory cards and NVMe SSD drives).
This isn’t assumed to be ground-breaking research, but I hope it may help someone some day. The method may be applicable to unstable memory cards and NVMe SSD drives as well.
Now, such drives do not only freeze Windows or do not only get disconnected when attached to a Windows system, they act in the same manner when accessed from a Linux system for example. Once they ‘crash’ the only thing that gets them going again is a power-cycle (or multiple even).
I discussed this blog post with Serge from DeepSpar Data Recovery Systems, and he had interesting insights that largely confirm my findings:
There are two general types of unstable flash devices. One type, which is less common, is where the storage device has areas which are consistently unreadable, i.e. classic bad sectors. The second type, which is more common, is what you describe where the freezing or other issues are not dependent on the sector you are reading
and..
The correct way to handle it is exactly what you’ve said – do multiple read retries.
and..
The very most important thing to do in all flash cases is not to let the flash device sit there hanging because whatever it is doing, you can be sure that it’s harming itself.
I think it’s good to emphasize the third point: The controller hanging is bad news! What we perceive as ‘hanging’ might as well be the controller being so busy with background processes that it simply puts us on hold. And as Serge points out these background tasks are potentially, or in his words, are most certainly harmful.
Bad NAND (?) and imaging strategies
Often read / access instabilities are attributed to bad NAND memory and general strategy is to image or clone such devices is employing several passes:
- Quick pass to get ‘good sectors’ while skipping bad sectors
- During subsequent passes skipped data is recovered while granting the drive longer time-outs and perhaps using techniques like backward reading
- Finally sectors that resulted in errors are tried
Much like a conventional spinning hard drive basically. Idea to skip ‘bad sectors’ and often skip an x number of sectors directly following the bad sector is that we get the bulk of the data even if the device all of a sudden fails entirely. But I am starting to wonder if this is the right strategy under all circumstances, specifically when dealing with flash based drives such as USB flash drives, memory cards and even (NVMe) SSD’s:
- Say we get errors ‘all over the place’, randomly distributed over the flash drive, then there’s a chance we skip over lots of relevant data during first pass. If now the device fails we will have to do without this data. I am now working on a device that randomly ‘drops’ almost from the start of the drive and that continues doing so throughout the rest of the drive. If I employ the skip algorithm and if the device would fail half way I’d for example have to deal with half the file allocation tables (FAT) being skipped. These kind of skips do not only affect an individual file, in fact they ‘down-grade’ the entire recovery.
- Errors on this device were numerous! If we’d save these for later passes and perhaps skip adjacent block and device would fail we’d basically have nothing apart from a corrupt file system and many corrupt files with holes in them.
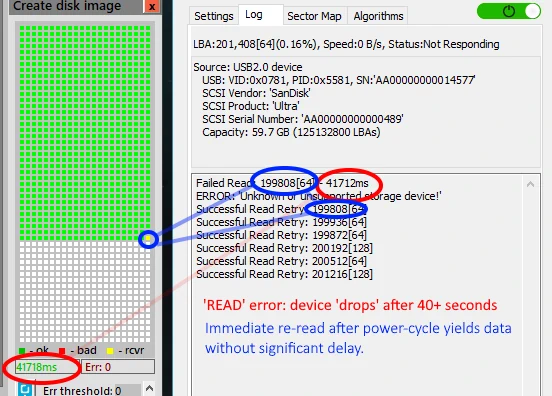
- And what I observed makes me doubt if it is the NAND that is bad in the same sense of bad sectors on a conventional drive: If I ‘sit out’ the read, it will eventually fail (after 30 – 40 seconds) and the drive ‘goes stupid’. If I however then power-cycle and immediately re-read, the block of sectors reads without error and without delay! So it seems to me it is the controller sabotaging us rather than the NAND. I am not saying the NAND is of no influence at all, just that in this case it is the firmware that is causing the dramatic slow down. It is no where similar to the ‘traditional bad sector’ that we may try reading several times in the hoped it will eventually return data. In this case, with the NAND flash based drive, the error is not related to any specific ‘sector’ we’re trying to read, it’s the controller spending processing cycles on background processes.
Determining optimal settings for imaging USB flash drive
So, as we can see it takes 40+ seconds for the device to fail the read. The imager is configured to do nothing and wait for DeepSpar USB Stabilizer to handle all read issues, and only once Stabilizer returns an error to try one re-read. Almost without exception the re-read succeeds within same time-span we can read ‘good’ sectors.
To further reduce time required to image the device, I then examine time time needed to read a block of sectors (I did 64 sector reads).
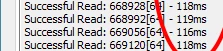
I take that as base to determine a good read timeout value because I do not want to wait 40+ seconds before the device drops. In this example I settle for 250ms read timeouts. USB Stabilizer will then report an error to the imager and power-cycle the USB flash drive. Imager is configured to sit this out until device is back and then retry the same block of sectors once. This way I can image the device with only 2 failed reads eventually. It took me little over one day, while the initial attempt using a ‘conventional skip strategy’ took 3 days (with larger 500ms timeout though) + half a day to retry skipped areas.
You can use any ‘imager’ you can set up to do re-reads after an errors. I myself also use DMDE for example which can be set up for this as well:
So in summary:
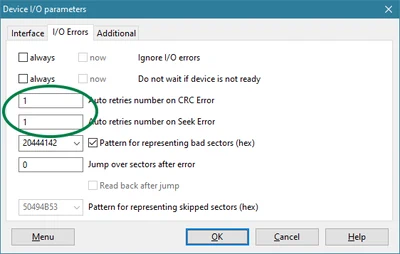
- Determine if re-read after power-cycle successfully recovers a ‘bad read’.
- Determine optimal time-out that passes okay reads and catches reads that are bound to fail
- Set up DeepSpar USB Stabilizer with optimal read timeout
- Setup disk imager of choice for one retry on failed read
Note for those who don’t have a DeepSpar Stabilizer
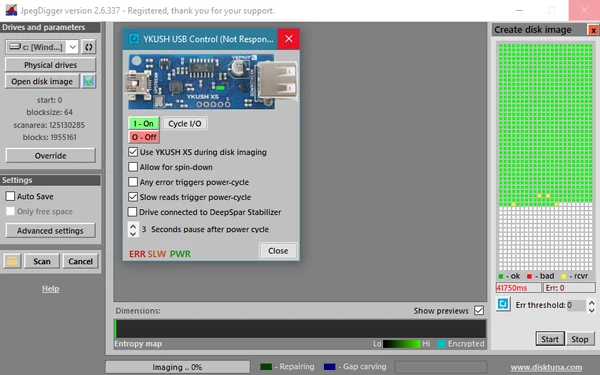
JpegDigger which I use as an example disk-imager can be configured to work with the YKUSH XS. As such you can automate the task of power-cycling the unstable flash drive: the drive used as example in this post in total has to be power-cycled 1000’s of times which is undo-able if you have to do this manually. Note however that JpegDigger has to wait out the device to fail the read and return an error, which as we saw can take 20-40 seconds with the example device and is a huge disadvantage compared to USB Stabilizer. JpegDigger has no way to ‘interrupt’ the read at this point when reaching a certain timeout value.
That said, to a degree it may be successful in avoiding the device dropping:
I observed increasingly slower reads some times build up to the controller eventually hanging. For example, good reads complete in < 100ms, then all of a sudden a read takes 450ms and then finally a 40s read because the controller eventually crashed while trying to do whatever it was trying to do. JpegDigger will try detect this and try to power cycle the device ahead of the controller hanging if the ‘Slow reads trigger power-cycle’ option is ticked (this being developed and tested at this point).