

Repair-JPEG.exe is the utility created by Wim Vanmaele that inspired me to add patching to my own JPEG Repair software. I can locate only one source on the internet that refers to this program. If that for some reason would seize to exist all references to it will be lost, which is why I will host it here as a backup.
Please note that mirroring the file here does not imply I can offer support for it. Is offered as-is and use on your own risk. As far as I know the program is freeware.
If you want to download the file, click.
Below is the accompanying Readme file.
JPEG-Repair Instructions (English Version)
Introduction
Who hasn’t encountered the similar examples of corrupted Jpeg files as below (see fig. 1-3):

fig. 1. – Part of the photo appears faded.
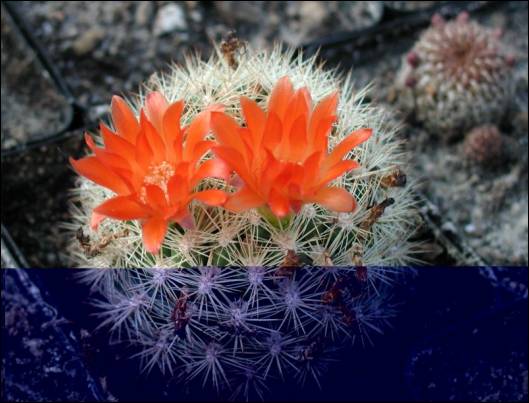
fig. 2. – Part of the photo has turned a different color.

fig. 3. – There is a strange often colorful artifact in the middle of a photo.
With a lot of patience you can cut and paste but you still might lose part of your photo. You can, using Photoshop restore the pictures but that is an expensive program to buy…Maybe there is another way.
JPEG (files ending with extensions .jpg or .jpeg) is a form of file structure which stores a picture in a compressed format. The complex algorithm is very difficult to hack and to understand. It is lossy compression and that doesn’t make things easier. What does lossy mean you ask? It means once saved the picture loses some detail, and this detail can not be recovered. Then again the advantage is the small file-size.
During my testing, I discovered that by adding one byte at a certain position in the jpg file the corrupted picture was restored. So all we need is a tool that would add a byte at a user-defined position. JPEG-Repair, the program I wrote, will allow you to do this.
As with any software, use it at your own risk!
Screenshots With Things to Keep In Mind
- Although this looks like a DOS program, just double click on repair-jpeg.exe to open the
program as in fig. 4.

fig. 4. – What repair-jpeg looks like when you first start it.
- Under the File Menu, select a corrupted jpeg and click OK to start editing the file. See fig. 5.
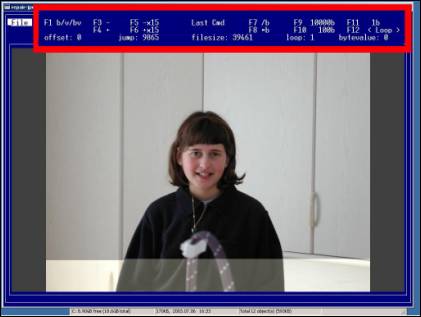
fig. 5. – What the program looks like with a photo loaded.
- Key functions, glossary and mouse actions in the program are as below:
Key Mappings
| Key | Result |
|
F1:
|
Add a Byte (b) This button works as a toggle switch Change the value, 1 Byte (the action of adding one Byte is Automatic)(v) Change the Value, 1 Byte and Loop (bv) |
| F3: | One step Back |
| F4: | One step Forward |
| F5: | Step Back (multiple times) |
| F6: | Step Forward (multiple times) |
| F7: | Step Size Divided by 2 (Jump) |
| F8: | Step Size Multiplied by 2 (Jump) |
| F9: | Step Size = 1000 Bytes (b) |
| F10: | Step Size = 100 Bytes (b) |
| F11: | Step Size = 1 Byte (b) |
| F12: | Number of Loops (loop of 6) |
Glossary
| Word | Definition |
| Offset: | Pointer or place where the Byte will be inserted |
| Jump: | Step Size |
| FileSize: | File Size of the Jpeg |
| Loop: | Counter when in Loop-Mode (see F5/F6) |
| Bytevalue: | The value of the added Byte |
Mouse Actions
| Left-Mouse-Click | Zoom In |
| Right-Mouse-Click | Zoom Out |
- The program will warn you if you tell it to add a byte or bytes beyond the end of the file as it currently is configured. See fig. 6.

fig. 6. – You told the program to add a byte(s) beyond the end of a file.
- Adding or moving Bytes will change the Picture. This is quite normal and is the reason of your corrupted file in the first place. See fig. 7.

fig. 7. – A change induced in a photo by inserting a byte or changing one.
- To correctly fix a photo use F3 and F4 to get to the bit where the picture begins to be defective See Figure 8 below which is using a magnified view, which you will probably want to use to zero in on the beginning of the error.

Fig. 8. – using F3 and or F4, move to the correct position of the Byte insertion point. This is where the file begins to become defective
Steps to Recovering a Corrupt jpg File:
- Select the File and click OK
- Choose working mode (F1)
- Move bit by bit through the file using F3 and F4, and maybe using F5 and F6.
- Adapt the step size (F7 F8 F9 F10 F11). The changes are sometimes difficult to notice.WARNING the zoom-in and zoom-out commands NEVER reflect the latest update!!!. Zooming is actually performed on the ORIGINAL picture; all other actions are performed on the .REPAIR.JPG stored in memory. Change the values if necessary.
- Once you get close to the corrupted area, use F5 and F6 while carefully watching the screen. You CAN NOT stop or halt a loop, therefore do not use large loop values. Remember your offset position and Use F3 to go back.
- The default step value is 1 (bv)
- Once satisfied with your results, click the X (top right window corner) to exit the program.
Restart the program to edit another file
Please note, the .repair.jpg file cannot be over-written by the program. If you want to edit the picture again you have to remove this file.
Nothing is perfect, but out of 1000 Pictures there were only about 10 that were not fixable. 75 were only marginally correctable.
Below are the fixed files:

fig. 9. – washed out section fixed

fig.10. – bottom blue section fixed

fig. 11. – Horizontal Blue Artifact fixed