

In this post I’ll explain how you can create a sector-by-sector disk image of a small USB flash drive or memory card using JpegDigger. This type if disk images are also referred to as dd or RAW image files. The disk image is an exact copy of each sector of the drive that was imaged.
Reasons and advantages of a disk image:
- Provides you with a safety net.
- Processing a disk image with file recover software is often faster than processing original media.
- It has diagnostic value (detection of bad sectors).
- In case of bad sectors, bad sector handling is isolated from file recovery process.
- Disk image can be shared with and processed by a 3rd party.
Specially in case of read errors a disk image is recommended. File recovery software typically reads areas multiple times, jumping back and forth between file system meta data and file data. It potentially ‘hits’ bad sectors multiple times, each time resulting in slow downs and potential freezes of the file recovery software.
During the image process each sector is typically read one time. Depending on imaging strategy bad sector can be tried multiple times or skipped altogether. By dealing with bad sectors at this stage, we isolate this problem from the actual file recovery phase.
Special considerations when imaging SD and other memory cards or small USB flash drives
USB flash drives and often memory cards too are accessed over USB. USB does not handle drives with bad sectors particularly well. It’s not uncommon for the USB device to be dropped if it does not respond quick enough. In many cases this means you have to deal with the dropped device and restart the imaging task.
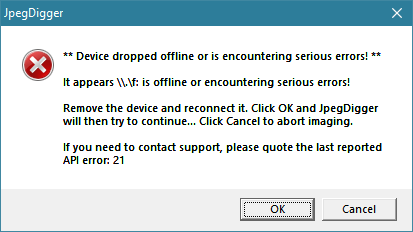
JpegDigger’s imaging module was designed with this problem in mind. If the device you’re imaging is dropped it will prompt you to disconnect and reconnect the drive. In case of a USB thumb drive for example, you remove and re-insert the drive. In case of a USB memory cards reader, you remove and re-insert the reader from and into the USB port.
Once you have done that you click OK and JpegDigger will continue imaging.
Note: If you’re frequently dealing with cases like these consider purchasing 3rd party hardware that allows JpegDigger to handle this task automatically and hands-free.
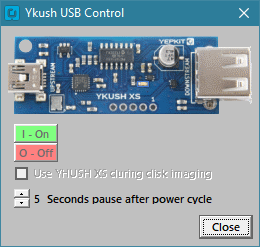
Ykush USB power controller allows JpegDigger to power cycle unstable memory cards and USB flash drives.
Creating a Flash Drive Disk Image using JpegDigger
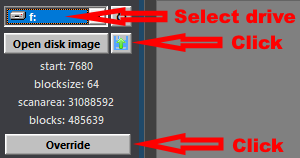
Select the drive you will be imaging from the drop down list. Depending on the state of the file system JpegDigger may open the Override Window. If it does not click Override. Click the button next to ‘Open disk image’ to open disk imaging module.
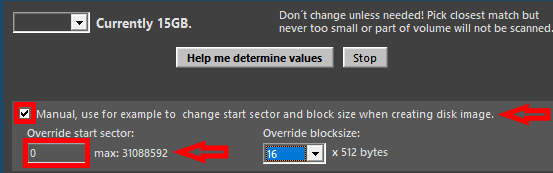
Check ‘Manual’, set start sector to 0 (zero).
Now we need to decide on a block size. There’s several consideration to be taken into account when selecting the block size:
- In general a larger block size results in faster imaging speeds.
- One block size is entirely ‘dropped’ when a read error is encountered. This means, if we encounter ONE read error while blocksize 16 is chosen, 16 x 512 bytes will not be read and therefor not included in the disk image. Instead JpegDigger will insert a zero-padded(*) 16 x 512 byte block. So, to recover as much data as possible from bad spots the smallest possible block size is preferred. In case of
manyread errors though, this will slow down the imaging process tremendously.
(*) – JpegDigger uses zero-padding to fill dropped blocks. Many tools will also include a string or pattern that makes finding files affected by bad sectors easier. However, since JpegDigger is a photo recovery tool, I took into consideration that zeros have a far less disturbing influence on recovered photos than other options.
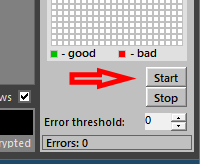
Click Start. You’ll be asked to select a location and image file name, for example ‘mysdcard.img’. JpegDigger does not assign an extension! To be compatible with other file recovery software I suggest to use .img or .dd extensions.
Once the disk image is done it can be analyzed by JpegDigger or any other file recovery software.