

Notice: As iRecover is no longer available I’m afraid you will need to look for an alternative. In this article there are some suggestions for NAS Data Recovery Software: https://www.disktuna.com/nas-data-recovery-software/
I was contacted by an iRecover user that was trying to do a NAS Data Recovery. It is clear to me from the start that he’s struggling a bit which I can fully understand as data recovery, and specially NAS data recovery can be quite complex. After all it is not something that most people do every day. Please note that at the end of this post you’ll find the correct procedure for recovering data from a NAS using iRecover.
There were 4 disks in the Iomega IX4-200d NAS, and one was about to fail I’m sure as the user described ticking and clicking sounds coming from the disk. He is trying to recover data by scanning the individual disks.
NAS Data Recovery.
Most multi disk NAS systems have the disks set up as a RAID. No matter the level of RAID (eg. RAID 0, RAID 5 etc.), the data is spread over several disks. So each disk contains only part of the data. For any particular file, the file’s data can be spread over all array members.
The entire NAS Data Recovery that follows can be done using a single tool, iRecover.
| Website: | http://www.diydatarecovery.nl |
| Download: | iRecover version used below (md-raid parser enabled) |
Cloning the dying disk.
At more than one occasion during the email contact I suggested that sending the disks to a data recovery professional may be a good idea. Because he didn’t appear to be really confident. Also and more importantly because of the ticking disk. He does not want that.
So, we need to clone the disk. To clone the disk we will need a disk larger than 2TB to clone the dying disk to. iRecover can be used to clone the disk to an image file. It has a built-in 2 pass disk-imager with advanced options to deal with ill behaving disks.
The advantage of cloning over doing an RAID and file system analysis on the disk is that we only need to read the disk once. With each read error we only need to deal once. For RAID reconstruction iRecover does lots of seeks which would stress the disk more and may as well push it over the edge.
NAS Recovery.
At this point I am contacted again and the user is doing a RAID analysis. The disk has been imaged, a process that took several days.
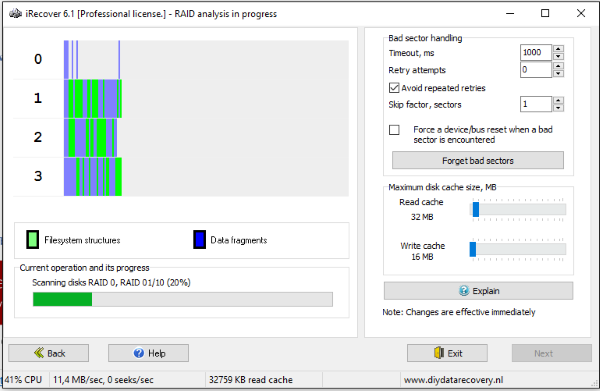
iRecover analyzing 4 disk RAID array
The above picture was taken 4 days (!) into the analysis. One of the four disks is, or better should be the image file. However the user selected the disk containing the image file rather than the image file itself! Due to this fact the analysis is doomed to fail.
Also, when doing a NAS Data Recovery using iRecover, it’s better to take advantage of the fact that most NAS devices are in fact Linux PCs, with an md admin configured RAID array. iRecover can interpret this information. If the RAID configuration data is relatively intact, RAID analysis is not required.
In the iRecover version used by the user until now, md-raid parsing needs to be explicitly enabled in advanced configuration. However in this version, md-raid is enabled by default. So, this is the version we will use from now on. We stop RAID analysis and run iRecover again. Instead of ‘RAID Recovery’, we select ‘Data Recovery for Windows and Linux’.
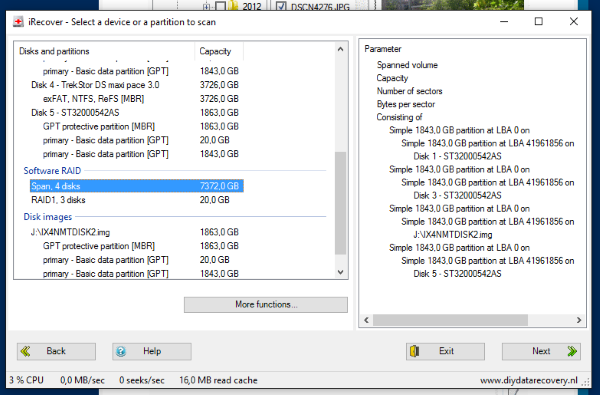
NAS Data Recovery – NAS volumes detected. Look for heading ‘Software RAID’
We see that iRecover immediately picked up the NAS RAID config and displays it under ‘Software RAID’. On the right we can one of the 4 disks is actually our disk image file.
NAS Data Recovery – File system analysis.
To recover the data from the NAS, all now iRecover has to do is analyze the file system. Just as if iRecover were used on a single disk. iRecover detects the XFS file system and is able to display a directory tree.
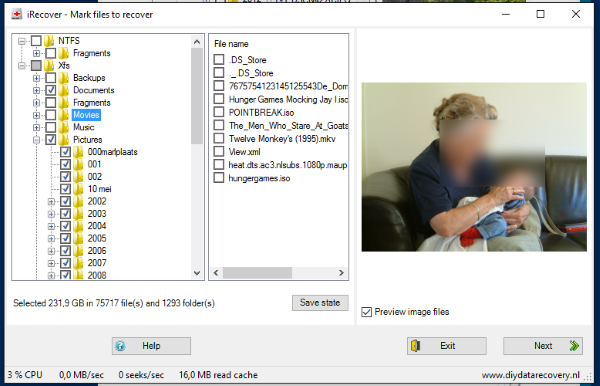
NAS Data Recovery XFS file system – Image preview blurred on purpose
Files were copied to another disk.
In conclusion.
The correct NAS Recovery Procedure:
Using iRecover you can do a complete NAS recovery. No other software needed.
- Start iRecover
- Click “Data Recovery for Windows and Linux“
- Select the largest “Software Raid” from the disk and partition list
- Click Next. iRecover now continues file system reconstruction as if you were recovering data from a single disk. So, basically for follow the same procedure that is explained in the video at the end of this page.
iRecover works with MD RAID based NAS devices and with the ext2, ext3, ext4 and XFS file systems. For every NAS data recovery software available today, you need to attach the disks from the NAS to a PC.
Setup Required:
In order to be able to do a NAS Data Recovery you will need a PC with enough ports to connect all separate array members + disks where you can copy the data to.
Also the power supply needs to be considered, as all those disks need power.
A 64 bit Windows version is preferred. The more memory, the better.
You need plenty of time and patience.
In this case one of the disks was dying which was a complicating factor. Cloning or imaging a 2TB disk can be time consuming. Time was wasted doing automated RAID reconstruction as the md RAID data was readily available. However RAID analysis may be required if the md raid info is too corrupt to use. Although the above example in not representative due to mis-configuration, RAID analysis can take anywhere from 10 minutes up to days.
Hi! Thanks for your information, very useful. Does it works for RAID 10 aray?
Hi,
Yes, should be fine. I recommend using this version (64 bit): https://www.disktuna.com/download/iRecover.zip