

JpegDigger is a light-weight, specialized tool that can help you recover deleted or otherwise lost photos. It was designed with memory cards in mind, but works on hard drives too. I created JpegDigger because a significant portion of the corrupt photos I receive are incorrectly recovered and beyond repair because of that. JpegDigger today is the result of many different real-world cases I worked on that could not be solved using available solutions (Stellar, RecoverIt, Disk Drill etc.).
|
Use the trial version to determine if JpegDigger can repair or recover your photo(s) prior to purchasing.
Dealing with the Windows Defender SmartScreen. Every time I update software, Windows SmartScreen will treat it as unrecognized app. It will take a fair number of downloads for SmartScreen to trust an app. Click ‘More info’ > ‘Run anyway’. |

Refund policy for this software: If the demo works for you and the full version doesn’t, then and only then we will issue a refund!
JpegDigger Features:
- Input devices: Logical drives, physical drives, disk images of logical/physical drives.
- Input file types: JPEG & RAW – NEF (Nikon), CR2 (Canon), ORF (Olympus), RW2 (Panasonic-Lumix), ARW (Sony) and DNG (from a Leica Q2) support. Note: Should work with all TIFF based RAW photos. NEW: detects non-TIFF Canon CR3 and Fuji RAF.
- Output: JPEG
- Detect JPEG file corruption.
- On the fly repair of corrupted JPEG photos.
- Simple on the fly defrag of fragmented photos (simple gap carving).
- FAT12, FAT16, FAT32, exFAT and NTFS file system support (for parameter detection).
- Automatic parameter scan for corrupt drives and unsupported file systems (Mac, Linux etc.).
- Previews generated from actual image data: WYSIWYG.
- Pass-through file saving: as it examines the file, it simultaneously saves file data, allows for hands-off operation.
- Deepscan: Non block aligned scanning NEW
- Reconstruct photos manually using ability to add and remove individual clusters to recover fragmented JPEGs NEW
- Ability to work with and create RAW disk images NEW
- Filters duplicate files NEW
- Functional trial: All features work, trial saves scaled down BMP photos.
| Honestly to say I was a bit skeptical about the recovery results. However yesterday I’ve found some spare time and decided to give JpegDigger a try. So besides saying thank you I would like to tell you that I am really impressed with the amount of files it found and recovered from an old HDD. I have tried a lot of photo recovery utilities before but from now on JpegDigger is my number one choice! :-)
Received by email |
JpegDigger is fairly simple and easy to use.
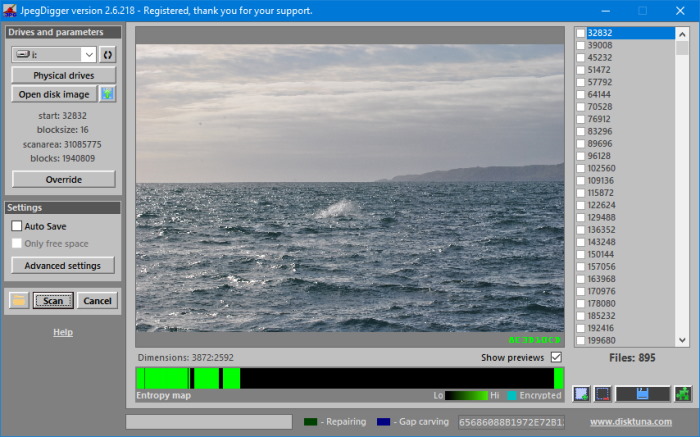
JPEG’s main screen. Click for more screenshots!
To recover lost or deleted JPEG photos follow these steps:
- Select a drive – it needs to have a drive letter assigned
- Select a destination drive – make sure this is a different drive than the source drive! You can skip this and JpegDigger will prompt you for a destination drive as soon as you ask it to save a file.
- Set maximum file size – check typical size of a JPEG produced by your camera. Minimum resolution allows you to skip small JPEGs including the ones in TIFF based RAW photos.
- Set some options or go with defaults – for example, check ‘Only free space’ to recover photos lost due to deletion. More info
- Click Scan
With Autosave set JpegDigger will now scan the selected media and recover all JPEGs. File names are automatically generated based on the LBA sector number on which they were found: ‘Sector.JPG’.
Some examples:
| Recover photos from RAW drive | Recover RAW photos | Recover after quick format |
|---|---|---|
About JpegDigger
JpegDigger was conceived to solve issues with corrupted photos received via my JPEG repair Service. Corrupt photos on memory cards can be caused by the underlying issue of a corrupt file system. To recover files from such scenarios typical file recovery or undelete software may not work. Also other cases were files were already recovered using 3rd party software were solved by recovering them using JpegDigger instead. In case recovered RAW photos are corrupt, JpegDigger can often at least recover those files as JPEGs. And thirdly JpegDigger was designed to solve some cases (recover photos) that could not be solved at all using popular photo recovery software such as Stellar Photo Recovery, Recover-it photo recovery and Disk Drill.
I already had a solution however JPEG Recovery LAB requires a lot of resources and time. So I decided to design a simpler carver that gets the job done in 9 out of 10 cases. JpegDigger today is the result of many different real-world cases I worked on that could not be solved using available solutions.
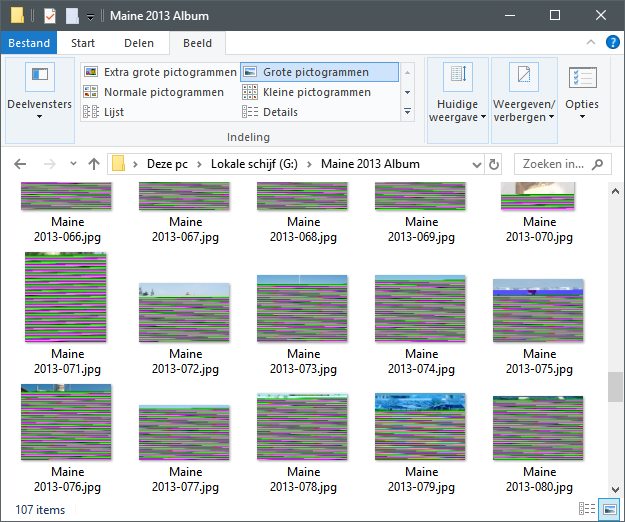
These look like corrupted JPEGs however the underlying cause is a corrupted file system
Carver
JpegDigger is a photo recovery tool of the ‘carver’ type. A carver, rather than scanning file system structures for files that are ‘flagged’ deleted, scan the media for certain file characteristics such as ‘magic numbers’. The simplest of carvers (most are) look for a JPEG start of image marker (SOI) and an end of image marker (EOI). Data in between those is assumed to be a JPEG file.
Advanced carving
JpegDigger is different as it actually ‘parses’ the JPEG data (code borrowed from JPEG-Repair Toolkit). This way it can verify the data is actually JPEG data, if it is formally intact (validation) and if it is a possibly fragmented file. In case of the latter it can stop parsing and look for JPEG data that may possibly be a continuation of the current file. In case the file violates some JPEG spec it can repair the issue or skip the file from being recovered.
On the fly error repair
Formal errors, so errors that violate JPEG specifications, can be corrected on the fly. This does not imply the photo will look okay but it will accomplish it can at least be opened (like JPEG-Repair Toolkit Patch mode does).
Advantages vs disadvantages of JPEG carving
The drawback of any carver is that only works for file types it ‘knows’ where a file system based recovery tool can recover any file type. Also, a carver will not be able to reconstruct a directory tree or recover original file names (in many cases). Main advantage is that it will work on corrupted file systems (as it largely ignores those).
Sequential media access
JpegDigger was designed with the idea to access the media only once, much like a disk-imager. As the detected file is parsed it also saved to a file so any specific sector is only accessed this one time. Later the option to save individual files was added which violates the principle. Enable autosave and JpegDigger works like the original: As sectors are examined, JPEG file data is saved simultaneously.
Free vs. full version
Free version only saves scaled down photos in BMP format. These are generated from the full size JPEGs. This gives you a fair chance to evaluate the tool prior to purchasing it.
JpegDigger vs JPEG Recovery LAB
Where JpegDigger can be regarded a light-weight tool with little system demands, JPEG Recovery LAB is the heavy weight. JPEG Recovery LAB supports more file types and will recover more photos in case they are severely fragmented. Truth of the matter is, that in 9 out of 10 cases where one wants to recover JPEG photos JPEG Recovery LAB it is pure overkill.
FAQ / Frequently asked questions / issues
The tool hangs during the scan: As JpegDigger actually processes the JPEG data, there is the chance that it will run into an unexpected condition. Of course I try to make it so that it still continues, but it is possible it runs into something I didn’t think of. Experience learns that JpegDigger will process the media with ‘Skip corrupted files’ enabled.
Media had has sectors: If the media has bad spots, then at this point JpegDigger can not scan it. In general in such cases it is advised to create a RAW image file of the memory card. Using something like OFSMount you can mount the disk image. You can scan the drive letter assigned to the disk image using JpegDigger.
Can JpegDigger recover RAW photos such as Canon CR2 or Nikon NEF?: No. It is fairly easy to add simple carving for those and other file types. But that’s not enough to offer the same level of support as for JPEG. JpegDigger tries to be good at one thing, and that’s recovering JPEG files. So, what it can do is recover the embedded JPEGs from those RAW files, even if they’re lost, deleted and corrupt.
Why would you want to recover JPEG rather than the original RAW files?: You don’t. But it may be the only option left in certain scenarios. I have recovered (at least) the full resolution JPEGs from corrupt and lost Canon RAW files from an SD Card that could not be recovered by any other software.
Can JpegDigger get the high resolution embedded previews from RAW photos at least?: Yes. From version 2.2.11 JpegDigger detects TIFF based RAW photos and recovers full frame JPEGs. Tested so far with NEF (Nikon), CR2 (Canon), ORF (Olympus), RW2 (Panasonic-Lumix, ARW (Sony) and DNG (from a Leica Q2). This can be useful if fully RAW capable software recovers corrupt RAW photos.
Hi There,
I’ve been recovering photos from a hard drive that used to be in an HP Windows Home Server. JpegDigger has done a fantastic job, but it looks like I’ve hit the limit of a single scan (32767 files). They’ve all been saved at this point, so is there any way to clear the files that have been scanned and pick up where the scan left off so I can finish the whole drive? If you hover over the progress bar, it says “Entropy last successfully detected file: 6.6950201737354”. Based on the progress bar it looks like it has about 10% of the drive left. Thanks!
Hmm, this is where it shows I had SD cards and such in mind. What does it give for start sector and block size in override window? With those we can calculate proper start sector and scan remaining 10% of disk. Oh and I need number of blocks too. So idea is if current start sector is say 2048 and block size 8, we restart scan at some sector address which for which ((sector address) mod 8 = 0) is true around 90% of drive. Then we use these numbers in define manually in override window.
But this also means homework for me, should be dialog there to yes/no to continue in autosave mode.
Hey I waited a couple hours during the scan process, and during the saving process, I got an error out of memory, and pressing okay completely closes the program… It was only on 3% through the saving process. I checked task manager and it was only using ~100 MB or so of memory. I have 16 GB of memory is there a way to allocate more? I checked and the last output the program had was a 122 MB file that is unopenable, so I assume this file was larger than the 100 MB maximum file size in advanced settings. Is it possible to push this value even further?
P.S.: Your email button no longer works, it doesn’t add your email in the address line.
Email button where exactly?
Hello,
Are you sure your camera actually produces > 100 MB JPEGs? I have never seen a JPEG that big yet. The 100 MB is an arbitrary boundary. What camera is this? if camera normally produces say 10 MB JPEGS then setting this to 100 MB in JpegDigger makes no sense whatsoever.
What other settings were selected? Normally if you set maximum size to 100 MB but run with defaults, JPEGs saved by JpegDigger will never get 100 MB, unless you select ignore EOI for example. There’s almost never a reason to ignore EOI markers though. And then again, if there’s a good reason to ignore EOI marker then that’s even more a good reason to set maximum size to something close that’s normally produced by the camera.
Also, I am confused, scan process is same as save process. It does exact same thing with JPEG data. So it detects JPEG, processes it and then decides if it’s a valid JPEG file or not. It does this during scan, and during save again, using same subroutines.
I’m actually more confused now, when I checked back to see the file that was over 100 MB, it turns out it was actually a png file. Why would jpegdigger be outputting pngs? Shouldn’t it ignore files that aren’t jpg or jpeg? Even more confusing is that I only have skip corrupted files, attempt file repair, and simple gap carving enabled, ignore EOI and deep scan were disabled.
This is also not a camera card, this is being recovered from a small drive that I accidentally formatted while reinstalling windows that contained my documents and pictures folders…
And the scan and save processes were separate because I hadn’t selected an output folder until after running the scan, after which I clicked select all and then save selected. I will be selecting an output folder beforehand in the future.
Hi There,
I’m currently trialling JpegDigger and it seems to be doing a fantastic job.
Honestly I’ve tried a LOT of data recovery and when you’re trying to recover literally 1000s of images, it’s really nice to have the auto-export low resolution/watermarked version for trialling over GUI previewing, so major kudos for that.
I am having one ‘issue’ though, I created a disk image from a hard drive – that worked fine.
I’m currently looking at only ‘free space’ with auto export enabled.
I’m noticing it’s exporting the same picture sometimes 100s even 1000s of times. same image, same ‘original’ resolution – many copies.
Is there a way to ‘fix’ this?
Thanks!
Hello,
Yes, I have seen that happen before. What is the block size and you run with default settings?
I have been pondering this, let me try to figure out a solution …
Thanks Joep, I appreciate your help, yep everything is default.
Another request would be to have the auto-save files save as JPEG, obviously still low res (totally appreciate), but to save space vs BMP.
Thanks!
FWIW current build default is filtering duplicate files.
Where can I find the demo version before I purchase?
Click the green download button….
i have 3 drives and it happend with the three of them, and i really dont now about the file system, i just bought the software so expected it to work properly
To test if works or not you use the demo. To get the file system you right click the drive (so c: or d:, click properties and it will tell filesystem: FAT32, or NTFS or exFAT etc.). Or you can also send me screenshot of disk management.
Can you try with this: https://www.disktuna.com/download/jpegrepair.zip
it didn’t work, same error, i can send you the screenshot by mail, right ??
Yes, thank you joep@disktuna.com
Try with latest version, it solves the error in other cases.
Hi sir! Every timei try to scan, I get this error:
Run-time error ‘13’:
Type mismatch
Any idea about the file system of the drive you’re scanning (eg NTFS, exFAT, FAT32)?
I can wait. Everything else sees the drive as NTFS and JPEGRepair can browse the files on it just fine. It is an odd issue.
Oh?! Well that is weird. And the drive letter shows up in JpegDigger as well .. yes of course, else you can not even select it .. I will look into it.
The drive shows in the list but the start is 0 block size is listed as 1 scan area is 0 and blocks are 0. oddly enough it picks up a separate 4 TB external connected to the system board back panel. I now get cannot determine file system type. and the drive is NTFS
I see .. If you can wait a little I can probably make you a build later today that will be able to work around this.
Yes, the 4 TB drive is probably intact. The drive you’re trying to scan is corrupt I assume, or a file system JpegDigger does not understand (so basically non FAT/FAT32/exFAT/NTFS).
Is there a drive size limit? I am trying to scan a 3TB external and get I cannot scan this drive Use override to set parameters. The override does not have the applicable choices for drive size or block size
And this 3 TB is not detected correctly automatically? Because there’s no limitation to auto-detect drive limits. Selection in override indeed offers limited choice, the rationale behind it is that the tool was written with memory cards in mind.
Hi,
Will this work as best as it can on an internal hard drive which has had killdisk used on it?
Some very bad decision when trying to wipe free space led to this, I’m sure it is not the first time
If you wiped / erased a disk using kill disk and that actually completed, then nothing will work
Works great I was able to recover old pictures that were on a external drive!
Now I tried with a laptop – Every time I hit Scan a error message pops up (run-time error ’13’: Type mismatch)
Any ideas why I get this message?
I think I had this same thing last week, and I think I fixed it. Can you email me (joep@disktuna.com) so I can send a version for you to try?
I sent an email with jpegdigger.zip attached, please let me know if it resolves it.
Yes it did ! Thanks
Every time I run this, it runs and gets to about 7% or less and then it hangs up, freezes, and stops responding.
Run on what? I mean memory card of hard disk? Also what happened to it, so why you need to recover the data?
I’m running it on my computer to attempt to recover photos on an external harddrive. The files all show there on the drive and they have a size on them (all files, not just JPEGs are doing this – saying when you go to open the file it comes up and says it looks like we don’t support this file type). I’ve tried a bunch of other things to recover the files, including renaming them and all that. What had happened that made the files unreadable was a boot image (about 3GB in size) for a Unix based timeclock was accidentally applied to this drive instead of the SD Card of the clock. It caused it to the drop the sector and made it unallocated space. That part is fixed, and the folders and files are all there just nothing will read them.
Okay. So we have no reason to assume bad sectors, which in general are my first thought. Default error detection is on in JpegDigger. If not yet tried enable ‘Attempt file repair’ in Advanced settings. The JPEGs you expect, were they taken with any particular camera or just random JPEGs? Maybe it’s easier to take this to email (joep@disktuna.com)?
Ok. Emailing reply.
Is there a JPEGDigger Photo Recovery option to download for MAC users?
Hello,
No I am so very sorry, there isn’t!
That’s a shame there is no Mac version this seems like the best option for me.
Hi! Every time I try to install this, I get error:
Run-time error ‘6’:
Overflow
Hello,
When you try to run it I assume. In disk management, what’s the size of the card? And is that the actual size of the card.
Error 6 btw is that I am not handling something correctly: I am doing some math with a zero that’s not allowed and I didn’t catch it, my mistake.
This was fixed a day later btw.
I just purchased this item and need to know how to use it, I am not to good with pc’s Your MyCommerce Share-it Order Number: NNNNNNNNNN
Does this help: https://youtu.be/PyeoxZDuZpg
Amazing results. Highly recommend to every person in the world that thinks they may have lost precious data.
Thank you Mike! Glad we got your photos back!