

JpegDigger is fairly simple and easy to use.
- Select source
- Select a destination drive – make sure this is a different drive than the source drive! You can skip this and JpegDigger will prompt you for a destination drive as soon as you ask it to save a file.
- Set maximum file size – Check typical size of a JPEG produced by your camera
- Set some options – see examples below
- Click Scan
In addition you can opt to:
- Enable autosave: Rather than building a list of files, JpegDigger immediately saves a copy of detected files.
- Only free space: This only examines clusters that are marked free in the file system. This option is only available if JpegDigger deems the file system reliable enough.
This video shows you how to perform a scan.
Selecting a source:
3 types of sources are available.
- Logical drive. These are volumes Windows has assigned a drive letter. Windows may fail to assign a drive letter to severely damaged devices.
- Physical drive. These are mass storage devices detected by Windows. You will need to use drive size to determine which one is your flash drive. You can also scan hard drives, but JpegDigger does not detect or scan individual volumes.
- Drive image: JpegDigger only works with sector by sector, dd-type image files.
Creating a drive image
You can use JpegDigger to create a ‘dd-type’ or raw drive image. Each drive image is a sector by sector clone of the source drive that is written to a file. Ergo, a 32 GB SD Card will produce a 32 GB image file.
Click the drive image button to create an image file of the currently selected drive. The image will be created with currently selected block size. If you want to change this, first click Overrides > Manual > change to desired block size.
On a healthy device, in general largest block size will result in fastest imaging. When trying to image an unstable device, with many bad blocks consider:
- One bad sector will cause the entire block to be skipped. So if block size is 16 and one block is bad, then one bad block leads to loss of 16 blocks worth of data. With only a few bad blocks, you could opt to pick a smaller block size.
- On a very unstable device with large amounts of bad blocks, a large block size allows you to skip over bad areas relatively quickly, and image good areas reasonably fast.
- Windows tends to disconnect ill behaving flash drives connected over USB. If this happens JpegDigger will prompt you to dis- and re-connect the drive. With lots if bad blocks this is impractical as you’d have to baby sit the process the entire time. To automate the process consider using JpegDigger with a YKUSH XS (https://www.yepkit.com/product/300115/YKUSHXS).
This video shows you how to create a drive image:
If things do not work the way you want them to
By this I mean for example, no files or hardly any files are detected or files in the preview screen are incomplete. In this case there are various options and features you can play with to improve results. However you should not just start changing settings randomly, instead evaluate what you’re seeing and change settings based on that.
- Entropy map: If the entropy map stays black then no data at all is detected. Changing settings is of no use, the card does not contain any data at all. If entropy map colors cyan then the data is probably encrypted. Encrypted data is common on micro SD cards used in smart-phones. Encrypted data can not be recovered in general, however in some scenarios it is possible; contact me.
- No files are detected: If after say 10% or 20% into the scan no files are detected JpegDigger may be scanning at the wrong offset or using an incorrect block size -> use Override
- Files are detected but cut off at bottom: Maximum file size is too small -> advanced settings, increase maximum file size. Don’t overdo this, instead refer to intact photos shot with the same camera and check their size. Add 1 or 2 MB to the largest file size of these known good files to be on the safe side.
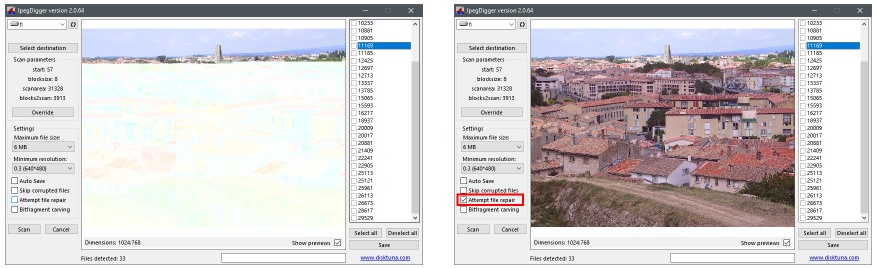
- Files are detected but cut off at bottom while maximum file size setting is okay: These files may be corrupt. Certain types of corruption prevent the full image from being rendered -> Advanced Settings -> Attempt file repair. This setting automatically overrides ‘skip corrupt files’.
- File are detected but cut off at bottom while maximum file size setting is okay and Attempt file repair option is enabled: The file may be fragmented -> Enable Gap carving in Advanced settings. This setting automatically overrides ‘skip corrupt files’ and enables ‘attempt file repair’.
So what I am trying to illustrate here is you don’t just change settings at random. You can also see how certain actions affect detection while others handle how detected files are processed by JpegDigger. If files aren’t detected in the first place, it has very little use changing how JpegDigger processes them.
| Setting | Affects detection | Affects processing |
| Override (start sector and block size | x | – |
| Skip corrupted files | – | x |
| Attempt file repair | – | x |
| Gap carving | – | x |
| Ignore EOI | – | x |
| Deep Scan | x | – |
| Maximum file size | – | x |
| Minimum resolution | x | x |
| Entropy | x | – |
Override
The Override window may pop up automatically if certain parameters can not be determine due to drive corruption. In case a scan hardly produces any files, Override is the first thing you want to try (rather than any of the advanced options).
Override allows you to configure two things:
- Start sector
- Block size
These two are vital for detecting your lost photos! JpegDigger needs to detect a JPEG signature that is located at the start of a JPEG file. In order to be able to do so it needs the correct block size and offset for first block.
The smallest addressable ‘unit’ on any LBA block device (a drive) is a sector. As files tend to be multiple sectors in size, multiple sectors are combined into clusters when formatting a drive. This reduces overhead: Assume one cluster of 8 sectors, this means we only have to keep track of 8 times less addressable ‘units’.
So from that we can conclude files always start at cluster boundaries. Rather than scanning each sector and determining if it is the start of file, we can safe a lot of effort and time by scanning at cluster boundaries. In order to be able to do that we also need to know the LBA address (sector address) of the first cluster!
Look at the image below to understand. We see clusters are 8 sectors in size, so if we scan at an 8 sector interval we should be able to detect each file. However, we need make sure we start scanning at sector 16! If we start 1 sector earlier or later we will miss all files! If we would assume a cluster is 16 sectors in size we would miss half the files too. You can also tell that if we start scanning at sector 0 and assume a block size of 1 sector we would detect all files. And although this is true it increases the amount of time we need to scan.

In many cases JpegDigger can read these values from the drive itself (the boot sector’s BPB section). If you deleted a file, or formatted a drive, these parameters are available and reliable. In case you accidentally format a volume it is very likely these parameters will be identical to the ones before the format as certain drive sizes will default to certain cluster sizes (https://www.disktuna.com/default-cluster-sizes-for-fat-exfat-and-ntfs/).
However if a drive is corrupt these values may be absent or incorrect. Also, when you accidentally reformat a memory card that was initially formatted in camera, in Windows or vice versa, these values may be incorrect (not matching previous format). The Override screen allows you to set these values. You can do this manually or you can have JpegDigger automatically try to determine these parameters (preferred option). JpegDigger refers to ‘cluster size’ as ‘block size’.
If JpegDigger can not determine these parameters by interpreting the boot sector of a drive, the Override screen will automatically pop up. If it does not, but JpegDigger fails to detect any files, the first thing you want to try is launch the override option and have JpegDigger scan for the correct start sector and block size.
If JpegDigger is unable to extract this information from the boot sector, the size may be incorrect too. In this case set is manually. It does not have to be exact, in general just pick the amount of GB as printed on the memory card label.
Click ‘Help me determine values‘ in the override window to have JpegDigger try detect correct values. This may take from a few seconds up to a few minutes.
Note: On a NTFS drive setting start to 0 (zero) and blocksize to 8 is virtually always correct when dealing with volumes up to 32 TB.
Options:
Maximum file size:
Adjust to the largest JPEGs your camera produces. Setting this value higher will make operation slower so just selecting highest value ‘to be on the safe side’ is a bad idea.
To determine this setting review the file size of some photos shot with the same camera.
Minimum resolution:
Specially when scanning a hard disk this is useful to skip small files that are bound to be present due to web browsers caching loads of small images.
Example: You shot photos using a NIKON D3000 then typically JPEGs produced are 3872 x 2592 and need to recover them from your hard drive. Set minimum resolution to 3 MP (3008 x 2000) to skip non relevant smaller JPEGs.
Also: If trying to recover JPEGs from RAW photos (TIFF based), set minimum resolution or the tool may recover lower resolution JPEGs. Some RAW photo types contain a medium resolution preview which may be recovered if it meets minimum resolution settings. I have seen NEF photos with 160×120, 1620×1080 and 7360×4912 JPEGs embedded for example. JpegDigger default setting would recover the 1620×1080 variant. If setting is set to 3.0 MP the high resolution JPEGs will be recovered.
JPEG from RAW is tested so far with NEF (Nikon), CR2 (Canon), ORF (Olympus), RW2 (Panasonic-Lumix), ARW (Sony) and DNG (from a Leica Q2) but should work on all TIFF based RAW photos. Non TIFF based supported formats are CR3 (Canon) and RAF (Fuji).
* Advanced options *
Skip corrupted files:
Part of the problem of file carving is that is bound to produce corrupted files.
First of all simple header/footer carvers produce many false positives. JpegDigger does not suffer from this problem as it uses more advanced carving where it actually parses JPEG structures. So, JpegDigger may detect what appears to be a JPEG based on the header, but discover it’s a false positive because it’s not followed by any valid JPEG structures. In this case it will skip the ‘file’.
Second category is JPEG files simply being corrupt. JpegDigger can to a degree detect corruption: It can not tell if a JPEG contains an intact and the correct image, however it can detect ‘structural’ errors.
Attempt file repair:
JpegDigger can often repair corrupt JPEGs to a degree where they can at least be opened/viewed after having been recovered.
Always try with this feature disabled first!*
Green LED will flash when repair is attempted.
Gap carver:
JpegDigger includes routines to detect non contiguous files and to attempt reassembly of such files. In general only enable this option if an initial recovery without this option produces incomplete files or images mixed with parts of different images. Enabling this option automatically invokes the file repair routines.
bifragment gap caring relies on a correctly determined cluster size as it is assumed fragments begin and end at cluster boundaries.
Always try with this feature disabled first!*
Blue LED will flash when defrag is triggered and attempted.
Ignore EOI:
The times you need to check this option is virtually zero. In other words, don’t do it.
Always try with this feature disabled first!*
*These features ‘force’ JpegDigger to deal with potentially corrupted data. This means it has to evaluate data and estimate whether to keep it or not. First of all this takes time, so it will slow down the process. Second big thing is that things can go wrong: potentially good data is discarded or even worse, corrupted (not on the source media of course) causing unexpected behavior.
Deep scan:
In the beginning of this manual I tried to explain why determining the correct offset for the first block and the block size were vital for detecting photos. However, there are situations in which photos do not start at a block or even sector boundary. For example, JPEGs embedded in RAW photos may not. This normally isn’t an issue as JpegDigger will detect RAW photos and then further process data to find the embedded JPEG.
Deep scan was added to address a very specific situation where the header for RAW files was corrupted and could not be detected. As a consequence the routine to extract the embedded JPEG was never triggered either! Solution is to abandon the idea to only scan at block boundaries, but this will make scanning incredibly slow. The deep scan option balances the need to scan non block aligned locations and scan speed.
Filter duplicates
If enabled JpegDigger calculates a hash for each file it detects and stores it. If next file is detected it compares the hash for this file against hash values of previous files. Identical files will produce an identical hash so JpegDigger can skip duplicates.
Entropy setting:
Since JPEG data, due to being compressed has a very limited entropy range, it is possible to determine to some degree if a block potentially contains JPEG data or not. JpegDigger uses this ‘knowledge’ to decide if it’s worth investigating a block or not. In general calculating entropy takes less time than analyzing a block of data.
If you want JpegDigger to discard entropy set it to examine data if entropy is between 0 (lowest possible value) and 8 (highest possible value). Note that this setting is not sticky and JpegDigger may modify it behind your back depending on certain advanced settings being active or not.
Manual file reconstruction
The Gap carve setting attempts to reconstruct non contiguous files, however this is very challenging and often will not work. To give an idea about the challenges, consider that we as humans can immediately spot the exact point where an image is truncated or mixed with another image. For software this is incredibly difficult to detect.
And since we’re so good at this, JpegDigger offers an option to manually reconstruct files: As files fragmentation points are typically at block boundaries it allows us to add and remove blocks from a file. For this feature to work correctly it is important that Gap carving is disabled (or you and gap carving may end up fighting which clusters to include/exclude) and Attempt repair enabled.
So, click Advanced settings and disable Gap carving and enable Attempt repair.
To engage the reconstruction mode double click the preview of the affected file. JpegDigger will display and populate a list of clusters. The clusters currently selected will be ‘ticked’. The idea is to exclude and include clusters and each time test your solution by clicking the Test button. Once the image looks okay, click Save.
- Truncate file: The lower part of the file may contain corrupt data or data from another file. So un-tick the last cluster and click Test. Once all corruption has been removed the bottom of the preview will look like a solid black block. Now it’s time to add the missing clusters.
- Add clusters: This is a matter of trial and error. Each time skip 10 or 20 clusters and then tick 4 or 5 and click Test. Evaluate if the image data that was added to the preview is potentially part of the file. If not un-tick the clusters again, skip 10 or 20 again and test with 4 or 5 selected clusters. Repeat until you hit a (partial) chunk that may belong to the file we want to reconstruct.
- Then grow this chunk up and down-ward by adding clusters until the file is complete.
- Click Save.
This video shows the process of manually reconstructing a fragmented photo
Examples:
Recover JPEGs deleted from a SD Card and select files manually, because you only need a few deleted files:
- Select a drive
- Select a destination drive
- Tick option free space only
- Click Scan
Now use the list on the right to review photos. Selecting one will dig up the preview. Put a check-mark in the box for the files you want to save. Click Save. if you didn’t select a destination drive yet, you will be prompted to select one now. If JpegDigger fails to detect the deleted files, try with free space only disabled.
Recover JPEGs from RAW photos that are incorrectly recovered by fully RAW capable software:
- Select a drive
- Select a destination drive
- Set minimum resolution to 3.0 MP (to skip lower res embedded JPEGs)
- Click Scan
This feature can be useful if software capable of recovering RAW files, recovers corrupted RAW photos. Example: JpegDigger can recover 8369 x 5584 JPEGs where other software (PhotoRec in this case) produced corrupted .DNG photos produced by a Leica Q2. Note that this was not due to a limitation in PhotoRec but due to actual DNG files being corrupt/fragmented.
Recover ALL JPEGs from a formatted memory card unattended:
- Select a drive
- Select a destination drive
- Review / Set maximum file size
- Set Autosave option
- Click Scan
JpegDigger will scan the media and save files automatically.
Recover ALL JPEGs from a formatted hard drive unattended:
It is assumed you need to recover ‘serious’ photos taken with a digital camera, not cached thumbnails etc..
- Select a drive
- Select a destination drive
- Review / Set maximum file size – Set minimum resolution
- Set Autosave option – Skip corrupted files
- Click Scan
JpegDigger will scan the media and save files automatically. To determine the minimum resolution review the camera user guide or compare to other photos show with the same camera.
Recover JPEGs from a formatted memory card that were incorrectly recovered:
- Select a drive
- Select a destination drive
- Review / Set maximum file size
- Set bifragment option
- Click Scan
The filenames of the corrupted files correspond with the sector number in the list on the right side of the JpegDigger window. If the preview shows a better image than the previously recovered one, put a check mark in the check box and click ‘Save’. The new file will overwrite the previously recovered file if the same destination folder is selected.
Same file without and with repair option
Even though the file may not look perfect, consider it can possibly be further improved using JPEG Repair.
What is a ‘carver’? Advantages and disadvantages of carving.
JpegDigger is a so called carver, also called RAW recovery tool. It largely ignores the file system. As things like a directory structure and file names are maintained by a file system, these things are not recovered by JpegDigger.
Memory cards are formatted with a FAT file system. Either FAT16, FAT32 or exFAT. Directory structure and file names are kept in directories. A typical entry looks like this (Simplified):
| myphoto1.jpeg | Size | Date and time | Attributes | start cluster |
| mytext.txt | Size | Date and time | Attributes | start cluster |
To get all clusters allocated to the file, the driver reads the file allocation tables (FAT). Let’s assume Start Cluster value 131. The file system driver now reads FAT entry 131 where it finds the value 132. This means the next cluster allocated to the file is 132. The entry in the FAT then points to the next cluster and so on until a special end of file value is reached. By following this chain of clusters the file system driver can determine all clusters allocated to any specific file.
Now we see some strange humps or gaps: FAT entry 134 points to cluster 138. Entry 139 points to 139. So it skips a few cluster which means the file is no stored in contiguous clusters. It is fragmented.
| 132 [entry no: 131] | 133 [entry no: 132] | 134 [entry no: 133] | 138 [entry no: 134] | 136 [entry no: 135] |
| 137 [entry no: 136] | 144 [entry no: 137] | 139 [entry no: 138] | 140 [entry no: 139] | 141 [entry no: 140] |
| 142 [entry no: 141] | 143 [entry no: 142] | EOF [entry no: 143] | 145 [entry no: 144] | EOF [entry no: 145] |
After myphoto1.jpg gets deleted the FAT looks like, while the directory entry for the file remains largely intact as well as the actual file content. It remains this way until the directory entry and clusters once allocated to myphoto.jpg are assigned to a new file.
If the memory card was re-formatted instead then ALL file allocation table entries would read zero.
| 0 [entry no: 131] | 0 [entry no: 132] | 0 [entry no: 133] | 0 [entry no: 134] | 136 [entry no: 135] |
| 137 [entry no: 136] | 144 [entry no: 137] | 0 [entry no: 138] | 0 [entry no: 139] | 0 [entry no: 140] |
| 0 [entry no: 141] | 0 [entry no: 142] | 0 [entry no: 143] | 145 [entry no: 144] | EOF [entry no: 145] |
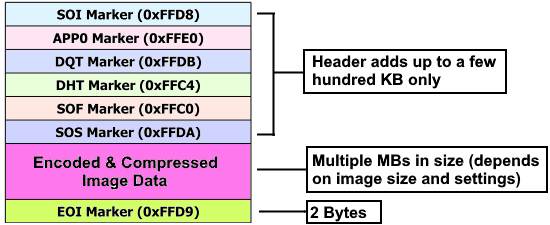
A typical JPEG file looks like this (if we’d look at the actual clusters in which the data is stored):
How recovery software recovers lost and deleted JPEGs:
To recover a deleted or lost file typical undelete, file recovery and photo recovery software will:
Locate the directory entry > Look up file size & start cluster > open new file (including original filename) > dump data from startcluster + file size > close file. From this you can tell that fragmented files will not be recovered intact.
Typical file carver ignores structures like directories.
Instead it scans media for FF D8 magic number to locate start of JPEG > keep scanning until FF D9 is reached and dump everything in between to a new file (header / footer carving). Another event that can trigger the end of a file is it detects FF D8 (start of a new file) or a certain threshold is reached (like a preset maximum file size).
A couple of problems and challenges arise:
Fragmented files can not be recovered. Also, all JPEGs start with the byte pair FF D8, but that does not mean that this byte combination is exclusive to JPEG: Possible result is ‘false positives’.
Also, as JPEGs can embed a preview or thumbnail JPEG (with all characteristics of a full JPEG) the routine needs to decide if it indeed detected a new JPEG or a thumbnail.
Carving the JpegDigger way:
JpegDigger also scan the media for magic numbers to identify the start of a JPEG. It then fires up it’s JPEG parser: Rather than keep scanning until it finds the possible end of file, it actually interprets JPEG markers. As long as this can be done without errors the likeliness it found a JPEG increases. Also, embedded JPEGs are not a problem as they are part of the normal JPEG structure and can be recognized as such.
It also allows it to detect structural errors in the encoded and compressed image data and to detect the file ending prematurely. And, with the appropriate options set it can attempt repair and/or finding the cluster where the file continues.
With regards to bifragment gap carving:
This is a fast but simple implementation and far less advanced than the defragmentation routines in JPEG Recovery LAB. it partially depends on the FAT file system and will be less effective on NTFS formatted hard drives.
| gap carving disabled | gap carving enabled |
|---|---|
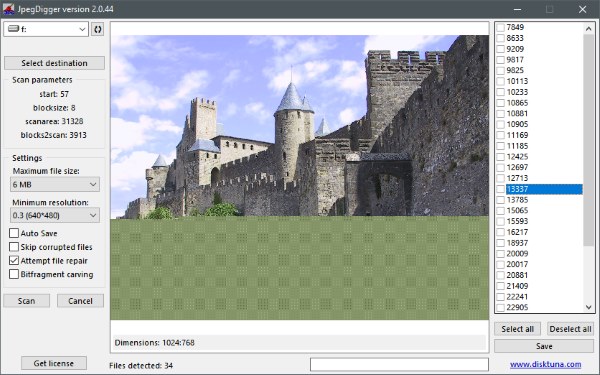 fragmented photo recovered without gap carver enabled |
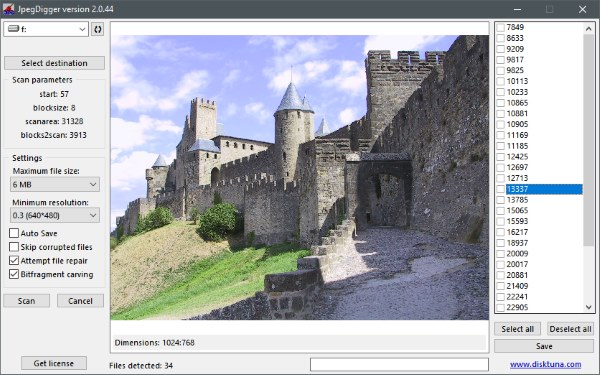 Same photo with gap carver enabled |