

JAR – JPEG Auto Repair: Help
How a JPEG works, in short
A JPEG doesn’t store pixels one by one. It stores the picture as small tiles called MCUs (Minimum Coded Units), left to right and top to bottom, like text on a page. JAR repairs a photo by moving and correcting those tiles.
- Blocks and MCUs. Each tile is built from 8×8 pixel blocks, one per colour channel: Y (brightness), Cb (blue) and Cr (red). Most cameras store colour at half resolution, so one MCU usually covers 16×16 pixels: four Y blocks plus one Cb and one Cr block.
- No fixed size. Every MCU is compressed to a different number of bits, with nothing marking where one ends and the next begins. The decoder only finds the next MCU by decoding the one before it.
- Brightness and colour are stored as differences. The average brightness and colour of each block is stored as a change from the previous block, not as an absolute value.
That is why damage spreads to everything after it. A few wrong or missing bytes make the decoder lose track. It falls back into step a little later, but at the wrong place, so the rest of the picture is shifted sideways. Because every block builds on the previous one, it often comes out too dark, too light or in the wrong colour as well. A missing chunk shifts the picture one way; a chunk of foreign data shifts it the other way.
Repairing comes down to two things at each damaged spot. First, delete or insert MCUs so what follows lands back in its place. Second, correct Y, Cb and Cr so the colour matches again.
Restart markers. Some cameras write a marker (bytes FF D0 to FF D7) every so many MCUs. At each marker the decoder starts fresh: the brightness and colour differences start from zero, and the data is realigned. Damage then stays inside one interval and the rest of the picture is unaffected. The data in a damaged interval is lost, so JAR fills that stretch with the row above it.
Repairing a photo, step by step
Most photos need only Open, Analyse and Repair. JAR never changes your original file.
- Open the damaged JPEG with Open…, or drag it onto the JAR window or the program icon.
- Check the two options (both on by default):
- Fill inserted blocks from the row above: new MCUs get the picture content above them instead of grey.
- Crop missing tail: when the data ends before the bottom of the picture, JAR makes the picture shorter instead of filling the missing part.
- Click Analyse. JAR first cleans a copy of the file: it removes bytes that don’t belong in JPEG data and stops where another file starts. Then it finds every damaged spot and works out how to fix it. Red lines on the picture mark where each problem starts.
- Read the gap list. Each line is one damaged spot:
- row and col: the MCU where it starts;
- del and ins: how many MCUs JAR removes or adds there;
- Y, Cb, Cr: the brightness and colour corrections;
- cost and seam: how well the result fits its surroundings; a high cost is a spot worth checking.
- Click Repair. JAR saves the result next to the original as name_auto.jpg. If it can’t write there (a read-only card or folder), it asks where to save. The trial version saves name_auto_trial.jpg, scaled down to 1024 pixels at lower quality.
- Use Original and Repaired to compare the two.
Damaged header. If the start of the file is damaged or missing, JAR asks for a reference file: an intact photo from the same camera with the same size and quality settings. JAR takes the header from it. You can also choose one beforehand with Reference header….
What JAR adds to its files. Every file JAR saves carries a short note: a JPEG comment such as Repaired with JAR – JPEG Auto Repair build 137 (www.disktuna.com), and, if the photo has no XMP data yet, the program name, which Windows shows under Properties > Details > Program name. The photo’s own Exif data (camera, date, exposure) and the image itself are not changed by it.
Trial, Home and Pro
JAR comes in three forms. All of them repair the same way; they differ in what you can save and in the extra tools.
| Trial | Home | Pro | |
|---|---|---|---|
| Automatic repair and assisted mode | yes | yes | yes |
| Diagnostic tools | yes | yes | yes |
| Saved repair | scaled down to 1024 pixels, lower quality | full size | full size |
| Batch mode (a whole folder) | no | no | yes |
| Extract JPEG from RAW photos | no | no | yes |
The trial lets you see exactly what JAR does with your photo before you buy: the preview and the zoomed view show the full repair. Enter your license key with Help > Register…; keys for JPEG-Repair work in JAR too. The title bar and Help > About show which license is active. Pro is meant for professional use, such as data recovery labs.
Why one photo repairs perfectly and the next one doesn’t
Two photos can look like twins, taken seconds apart and damaged the same way, and still JAR repairs one perfectly and gets the other partly wrong. The difference is not in the damage itself but in where it lands in the picture.
JAR can’t see what the photo should look like. At every damaged spot it tries possible fixes and keeps the one where the rows line up best with the rows above. That works well when the picture gives it something to line up: edges, texture, detail. It gets harder when:
- The damage falls in a plain area, such as a white wall, a sheet, a clear sky or a studio background. Almost any shift “fits” there, so the picture gives JAR little to choose by.
- A long, straight, upright edge runs through the damaged rows, such as a door frame, a railing or the side of a box. To JAR, such an edge can look just like the break a missing piece of data causes, and it may line up on the wrong one.
- Damaged spots follow each other closely, so there are few good rows between them to judge by.
In one of a pair of near-identical photos, a missing piece may fall on the detailed part and be fixed perfectly. In the other, the same kind of damage lands on the plain background next to a straight edge, and that band of the picture ends up shifted. Nothing is wrong with the second file, and the repair isn’t “worse” in general; that one spot is simply harder to judge.
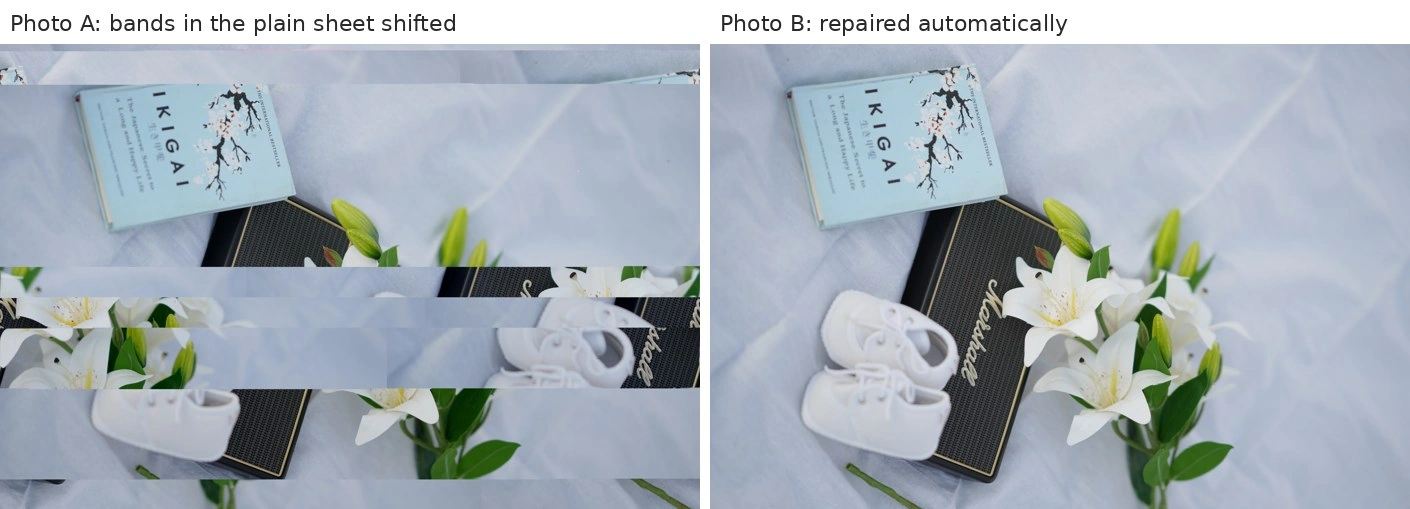
Both photos above come from the same shoot and have the same kind of damage: about 14 pieces of data missing at regular intervals. In photo B the automatic repair is perfect. In photo A, several missing pieces fall on the plain sheet, and the nearly upright edge of the black box runs through the damaged rows. JAR took that edge for the break and shifted those bands. Those few gaps are the ones to fix by hand in assisted mode.
That’s what assisted mode is for: JAR does the bulk, and you fix the few spots it couldn’t judge. In the gap list, a high cost (the rightmost number before the seam) is a good hint where to look first: it means the edges still don’t fit well after the fix.
Assisted mode: fixing a spot yourself
When the automatic repair gets one spot wrong, you correct that spot yourself, one gap at a time, and keep everything JAR got right. Assisted mode isn’t available yet for photos with restart markers.
Moving the picture back into place. Click a gap in the list; the panel below shows where it is and what JAR chose. Then change Delete or Insert with the − and + buttons, or type a number.
- Delete removes MCUs at that spot, so everything after it moves to the left. Use it when the picture after the damage sits too far to the right: there is data that doesn’t belong there.
- Insert adds MCUs at that spot, so everything after it moves to the right. Use it when the picture sits too far to the left: data is missing.
- One full row of MCUs moves the rest of the picture up or down by one row.
- Row and Col move the spot where the fix starts.
Finding your way. Clicking a gap shows the preview with the gap marked in red: a solid red step where it starts and, when MCUs are inserted, a dashed red step where the inserted MCUs end and the picture continues. That dashed step is usually where you see the seam. Yellow ticks along the top and left edge form a ruler; the legend in the corner says how many MCUs one tick is and how large the grid is (for example 266 × 354 MCUs). Use it to estimate how many columns something is out of place: half the width is about half a row of MCUs.
Correcting the colour. If the picture after the spot is too dark or too light, move the Y slider. Cb runs from yellow to blue, Cr from green to red. Slide until the part below matches the part above. The round button next to a slider sets it back to 0.
The buttons:
- Apply rebuilds the preview with your values. Everything after the gap moves with it; the gaps further down keep their own fixes.
- Reset gap goes back to what JAR chose for this gap.
- Re-plan below keeps your fix and lets JAR search again for all gaps after it. Use it when your change moved things so far that the automatic fixes further down no longer fit.
- Zoom on gap shows the rows around the gap at full size, with a red line at the spot.
When the preview looks right, click Repair to save it.
Batch mode: a whole folder at once (Pro license)
With a Pro license, JAR repairs every JPEG in a folder in one run, without asking questions. It’s meant for professionals with a card or a recovery full of damaged photos. With a Home license or in the trial the menu item is greyed out.
- Choose Tools > Batch repair folder… and pick the folder with the damaged JPEGs.
- Optional: choose a reference header: an intact photo from the same camera with the same size and quality settings. JAR uses it for every photo in the folder whose header is damaged. Without one, those photos are skipped.
- Click Start. Each photo goes through the same steps as Analyse and Repair, with the options from the main window (Fill inserted blocks, Crop missing tail).
Where the results go. Repairs are saved in a subfolder JAR_repaired, under their original names. If that folder can’t be written (a read-only card or image), JAR asks for another folder. Photos without damage are not copied. Open output opens the folder.
The log. Every photo gets a line in the window and in JAR_batch_log.txt next to the repairs: repaired, no damage, skipped or failed, with the number of gaps, the time and a note. The log is tab-separated, so it pastes straight into Excel.
Skipped photos are ones JAR can’t do without help:
- a damaged header and no reference file;
- progressive JPEGs (not supported);
- damage the automatic repair can’t encode: open these in the main window and use assisted mode.
A photo that causes an error is logged as failed and the run continues. Stop ends the run at once; the photo it was working on is not saved. A batch takes roughly 5 seconds to a minute per photo, so a large folder is something to leave running.
After a batch run the main window has forgotten its own analysis: click Analyse again for the photo that was open.
Extracting JPEGs from RAW photos (Pro license)
Almost every RAW photo carries a ready-made JPEG inside it, the preview the camera shows on its screen. Tools > Extract JPEG from RAW photos… saves that JPEG for every RAW file in a folder. It doesn’t repair anything; it’s the quickest way to get viewable photos out of a pile of RAWs, also when the RAW data itself is damaged and won’t open in a RAW editor.
- Choose Tools > Extract JPEG from RAW photos… and pick the folder with the RAW files.
- Click Start.
For each RAW, JAR saves the largest embedded JPEG as name.jpg in a subfolder JAR_extracted, with a log JAR_extract_log.txt listing the size of each one. It handles the common formats of Canon, Nikon, Sony, Fujifilm, Olympus, Panasonic, Pentax, Samsung, Sigma, Leica and others, including DNG. It finds the JPEGs without depending on the file structure, so it also works on RAW files that are partly damaged. If the embedded JPEG itself is cut short, JAR saves what is there and says so in the log.
Exif data. Some cameras, Nikon and Canon among them, don’t put Exif data inside the embedded JPEG. JAR then copies it from the RAW file: the date taken, camera and lens, exposure, GPS and the rotation, so portrait photos show upright. The log notes Exif copied from the RAW for those files.
How big the result is depends on the camera. Canon, Nikon, Sigma and Leica embed a full-size JPEG. Fujifilm and Panasonic usually embed about 1920 pixels wide, and Olympus a reduced size as well. That’s the largest JPEG those cameras store, not a limit of JAR; a larger image needs the RAW data itself to be developed.
Diagnostic tools: looking inside the file
Tools > Byte map, entropy, histogram shows what is in the file itself, before any repair. Use it to judge whether a photo can be repaired and where the damage is.
Byte map. Each pixel stands for a few bytes of the file, read from top to bottom. Healthy JPEG data looks like even, fine noise. Move the mouse over the map to see the offset; click to copy it for a hex editor. Damage stands out as a different texture: a block of zeros (black), a stretch of another file, or a regular pattern. With JPEG markers on, the map adds colours:
- blue: FF 00, which is normal inside JPEG data;
- green: restart markers (FF D0 to FF D7), normal when the camera uses them;
- red: any other FF xx. Inside the picture data that means damage, and those bytes have to go. JAR’s clean-up step removes them.
Entropy. Entropy measures how random the data is, from 0 to 8 bits per byte. Compressed data such as a JPEG’s picture data is close to 8; the dashed line marks 7.6. A dip below it means something else sits there: zeros, text, or part of another kind of file. The blue line marks where the picture data starts.
Histogram. It shows how often each byte value from 00 to FF occurs in the picture data. In a healthy JPEG it is nearly flat, with 00 and FF standing out. Tall spikes mean data that isn’t JPEG.
Videos
- Video: repairing a photo automatically (Open, Analyse, Repair)
- Video: assisted mode, fixing a shifted spot and its colour
- Video: a damaged header and a reference file
- Video: reading the byte map and entropy
- Video: batch mode on a folder of damaged photos (Pro)
- Video: extracting JPEGs from RAW photos (Pro)